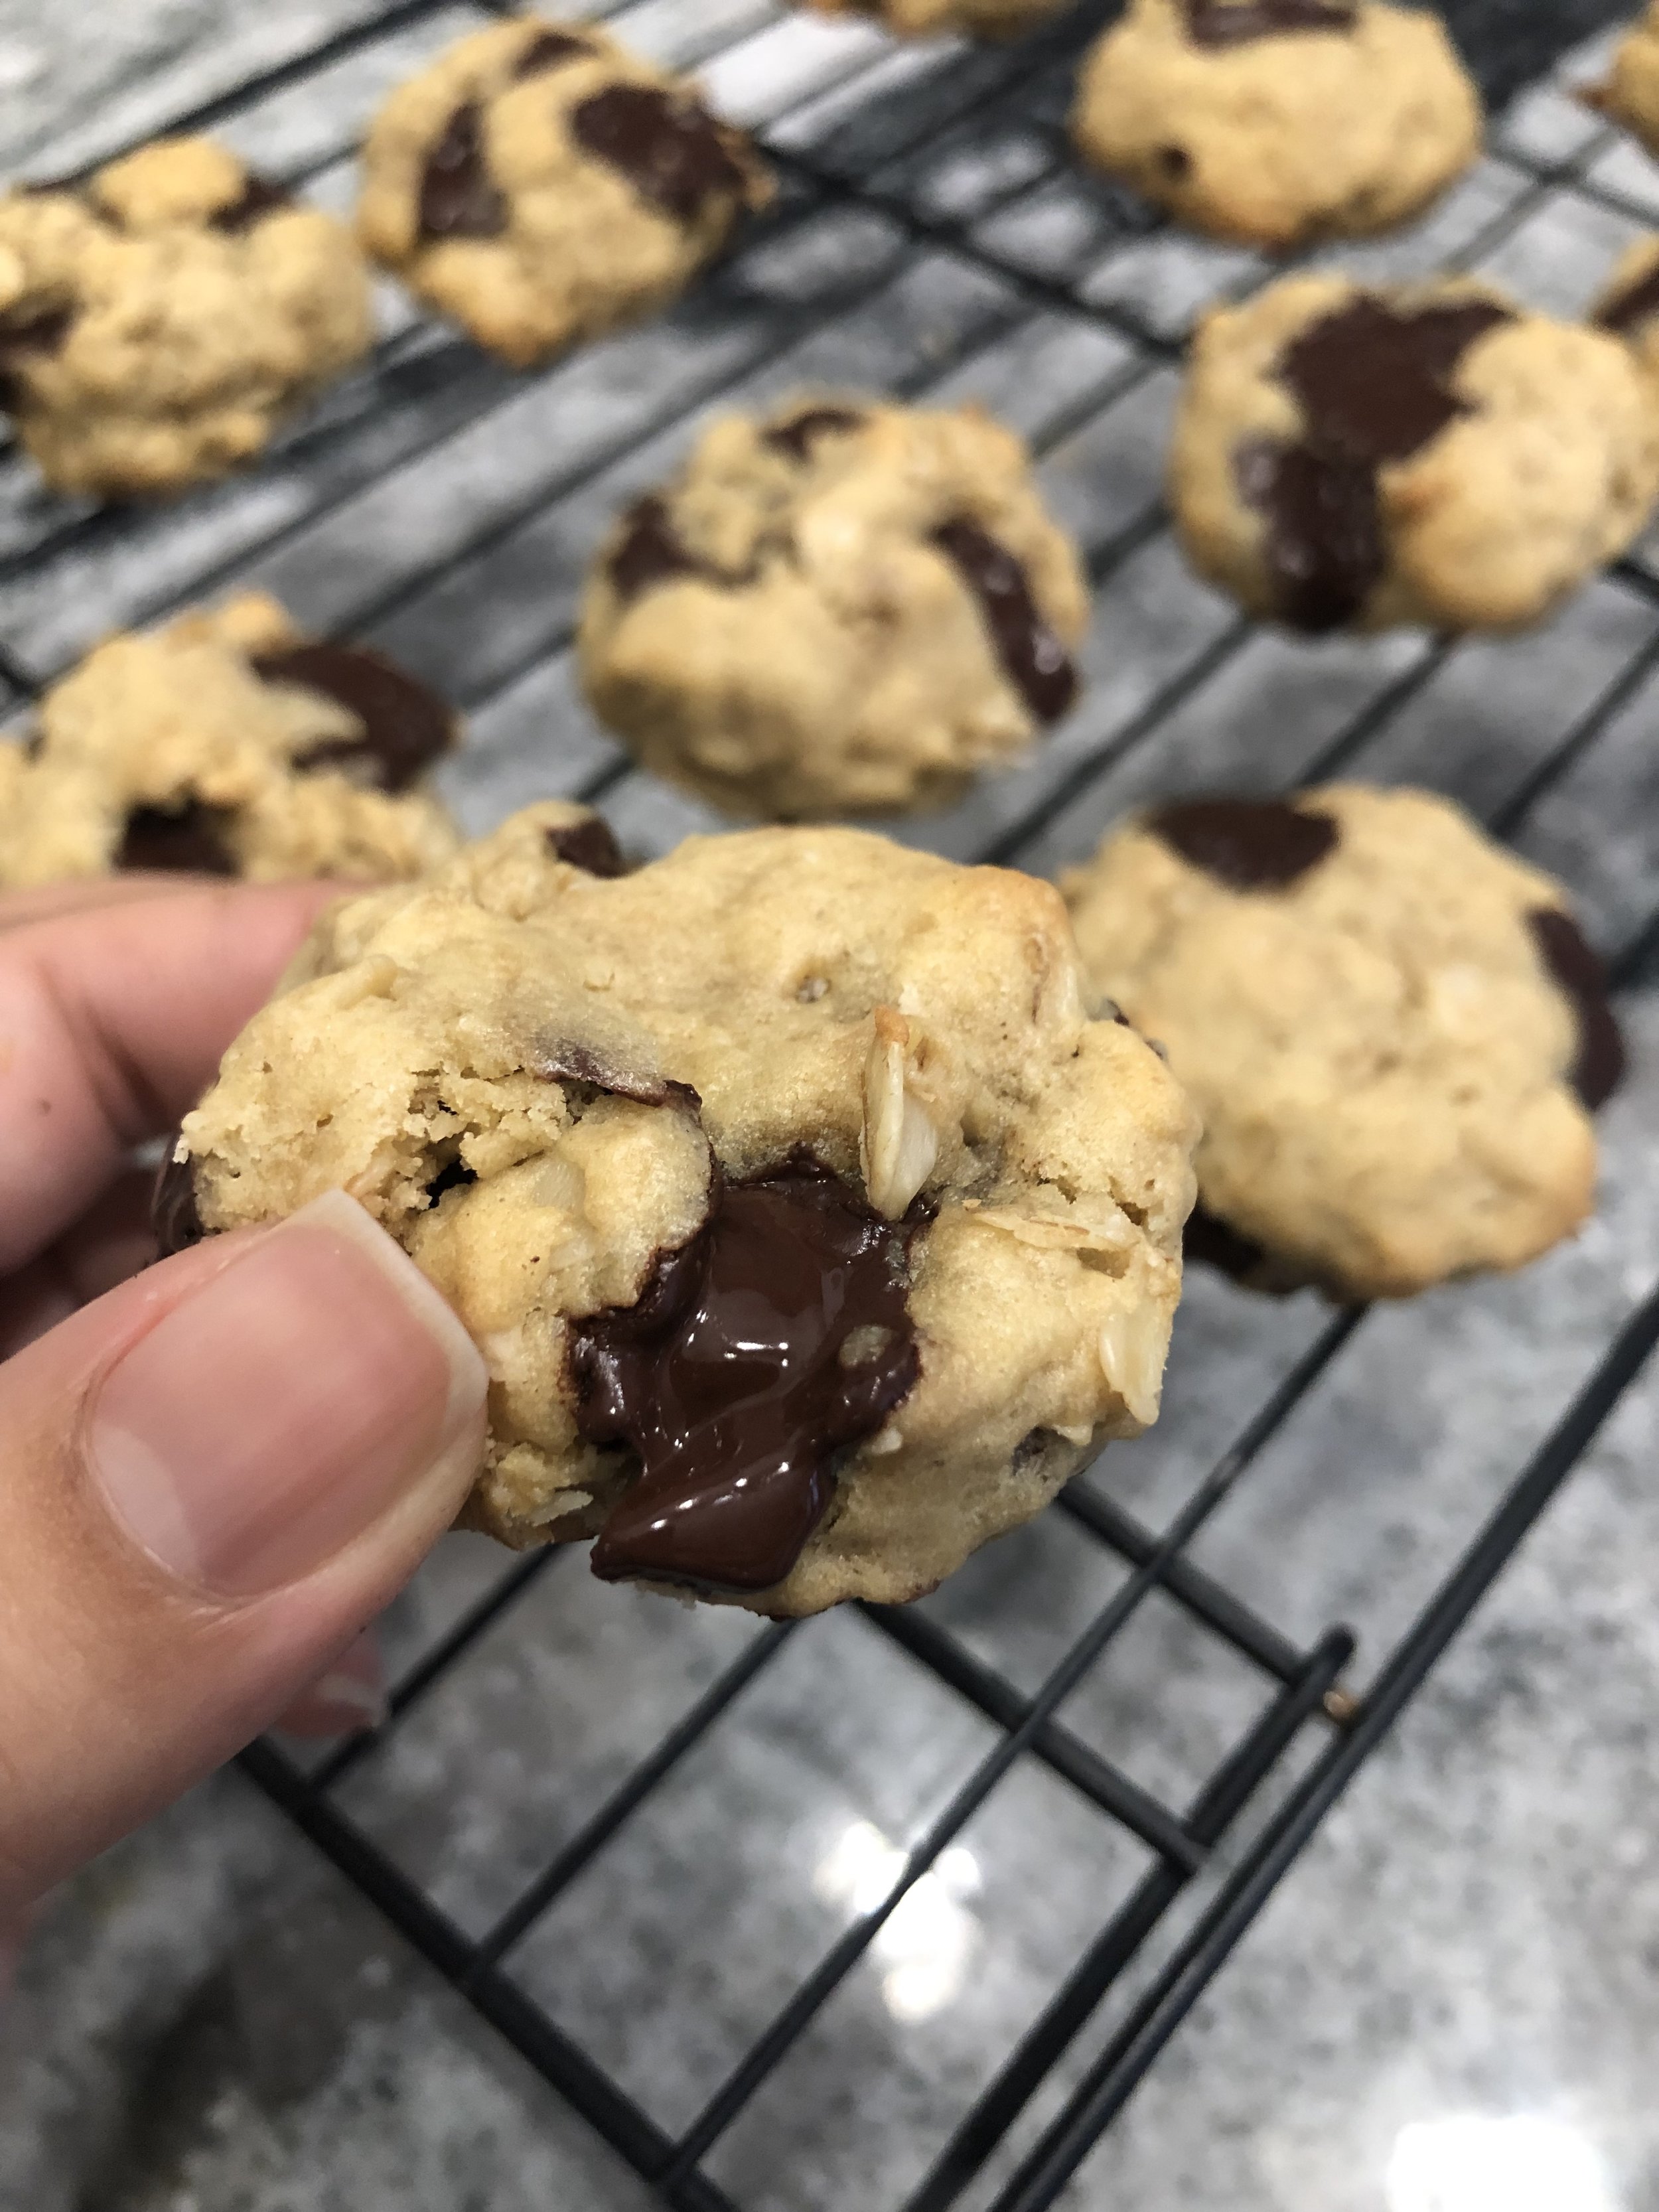
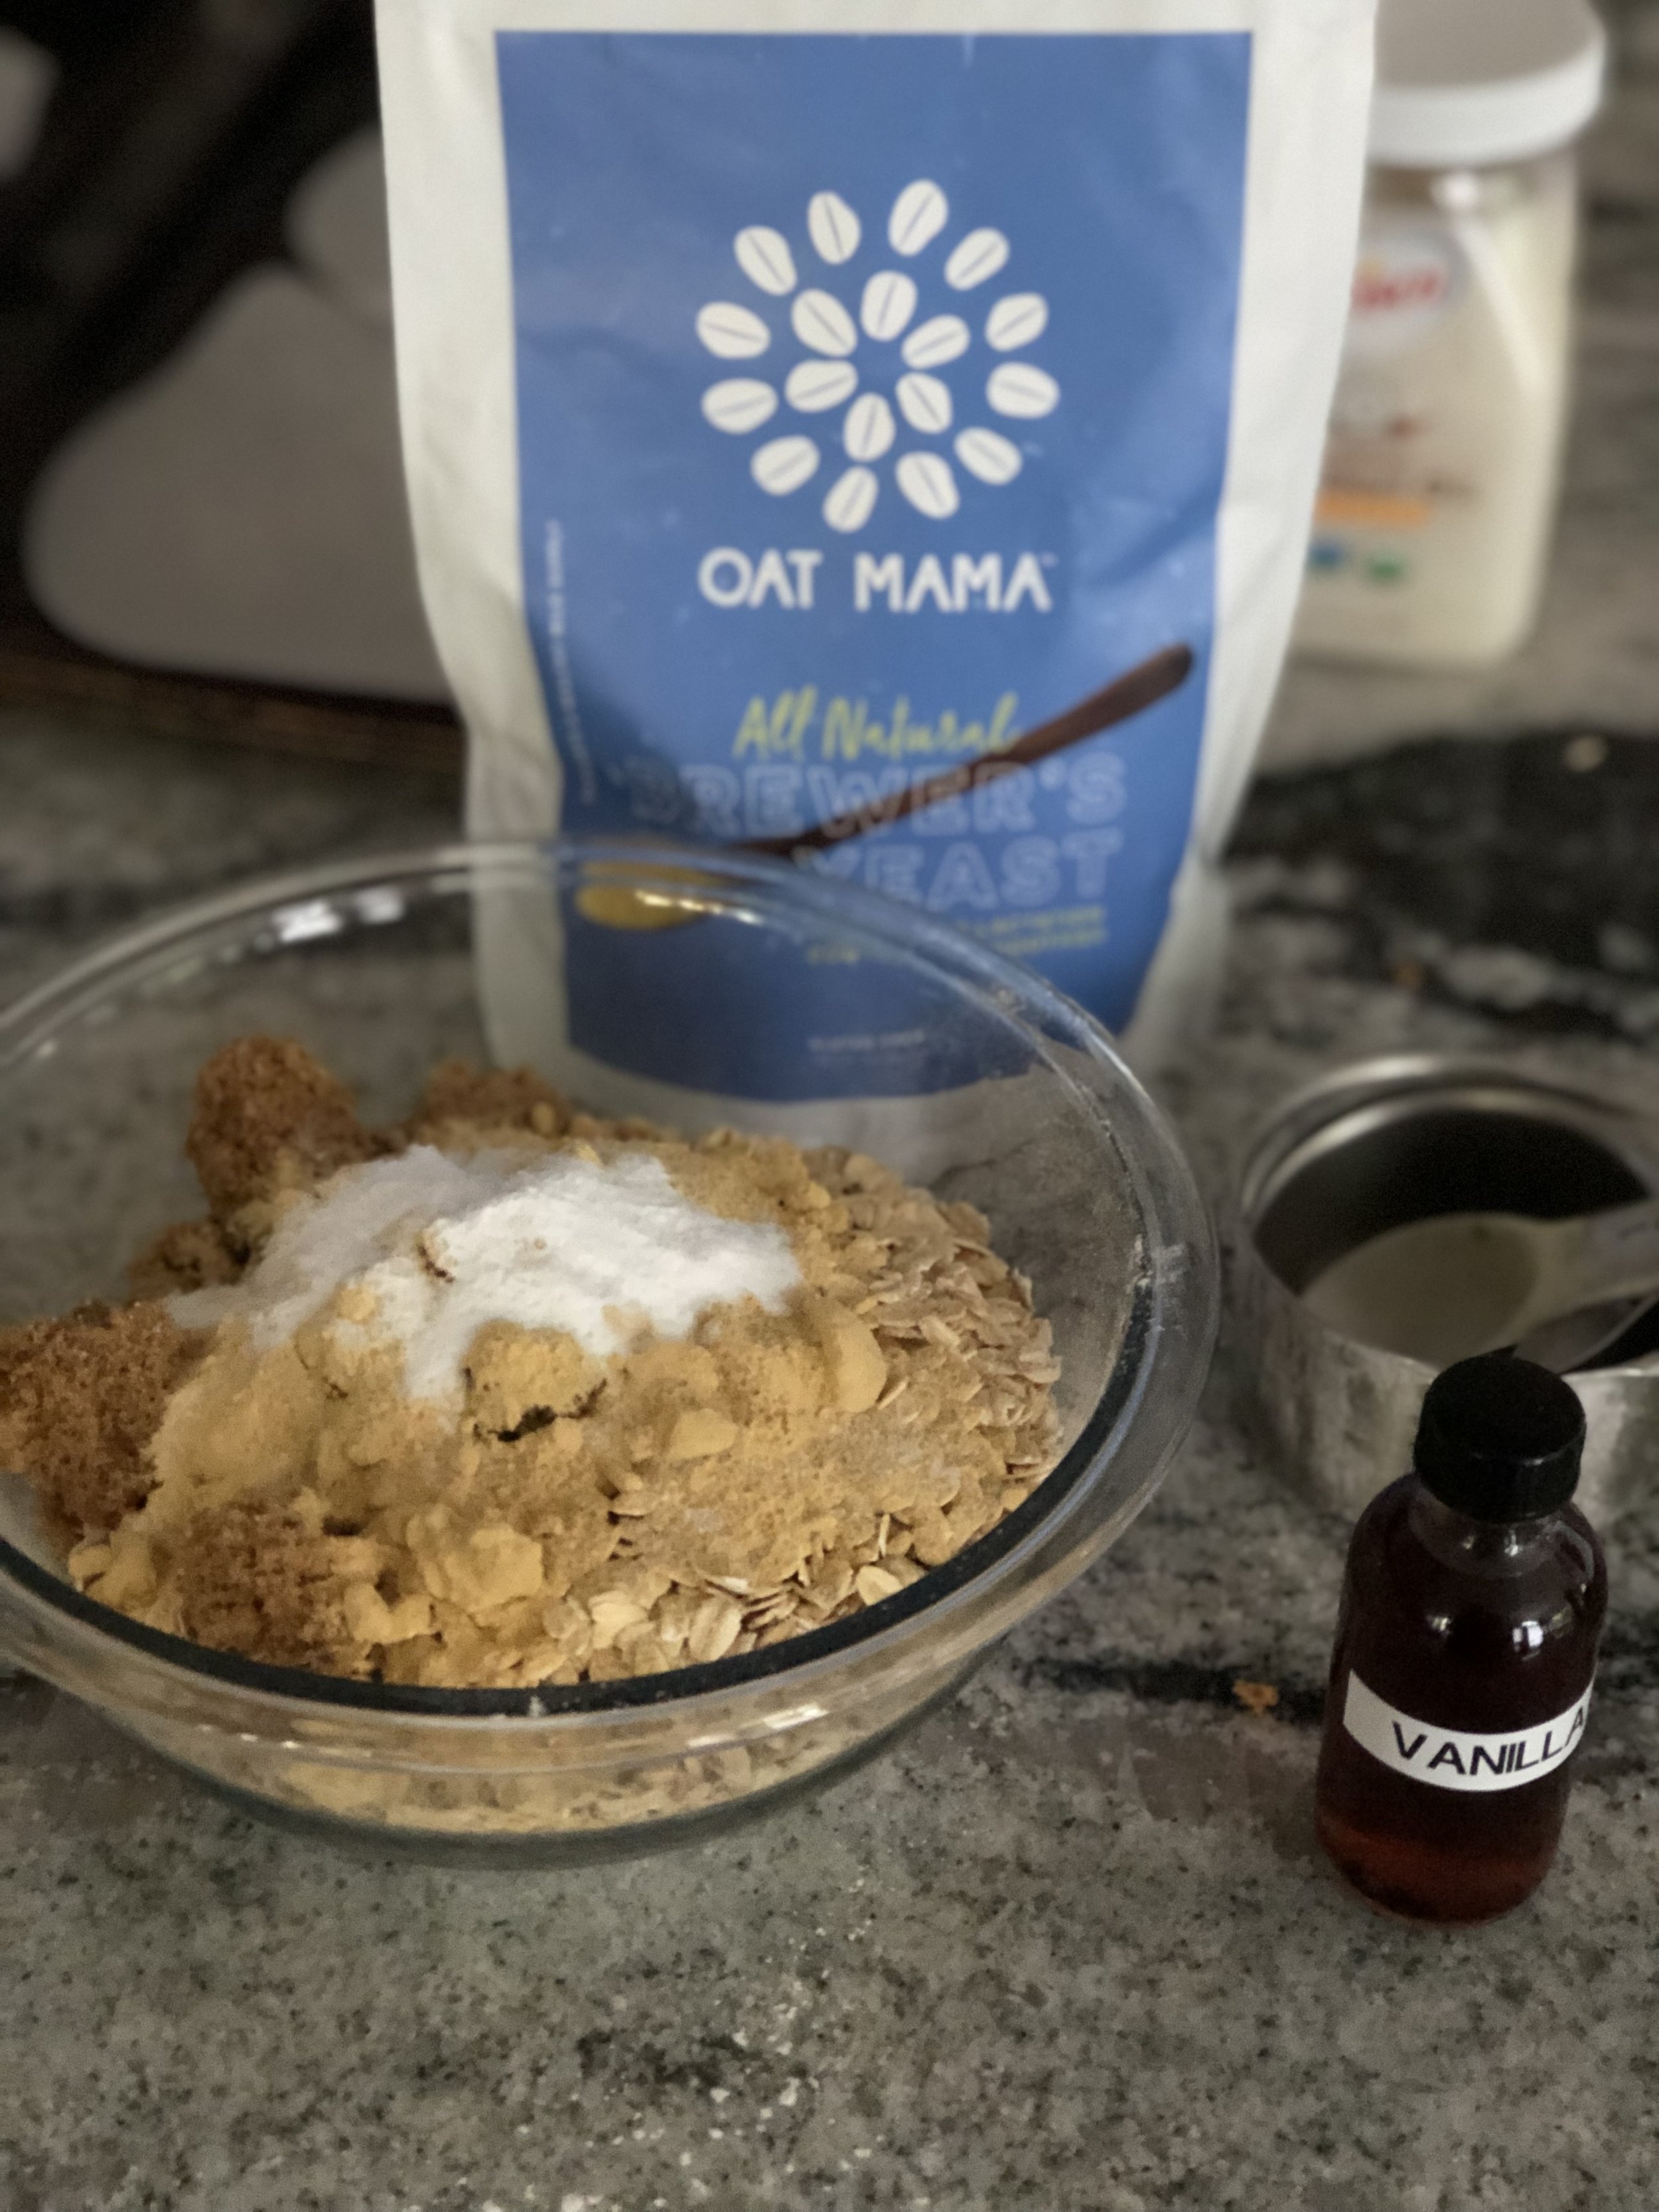
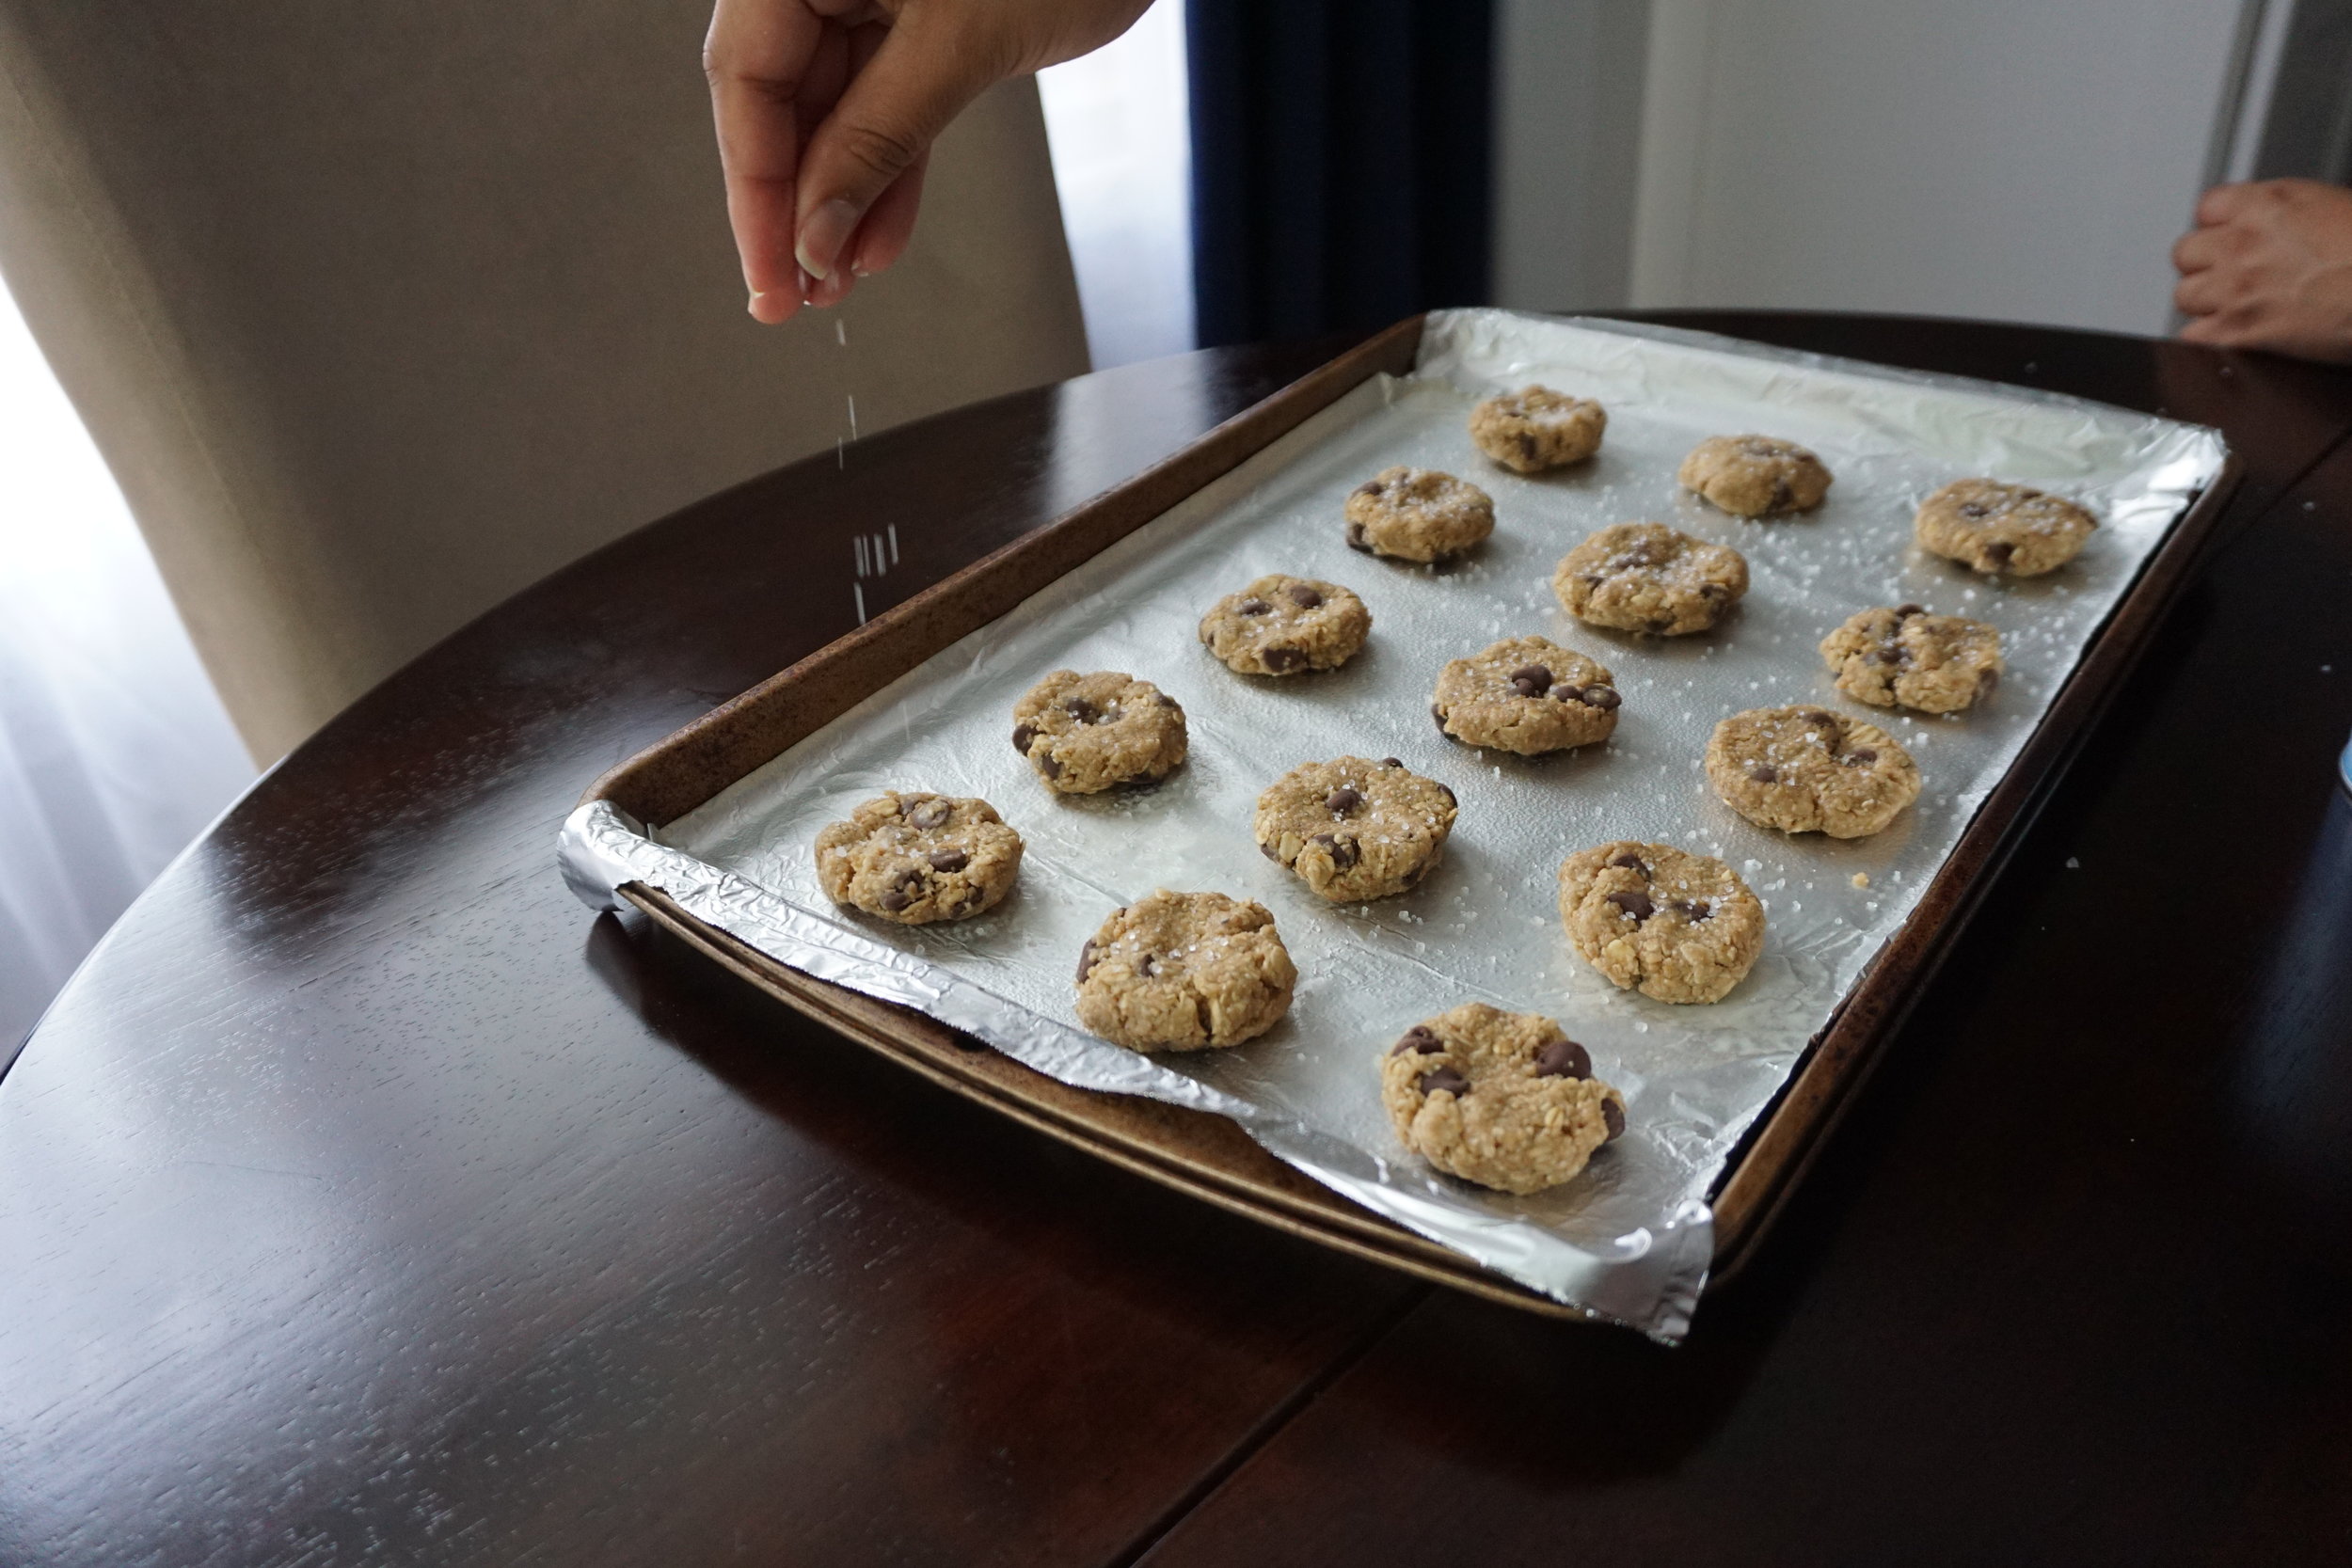
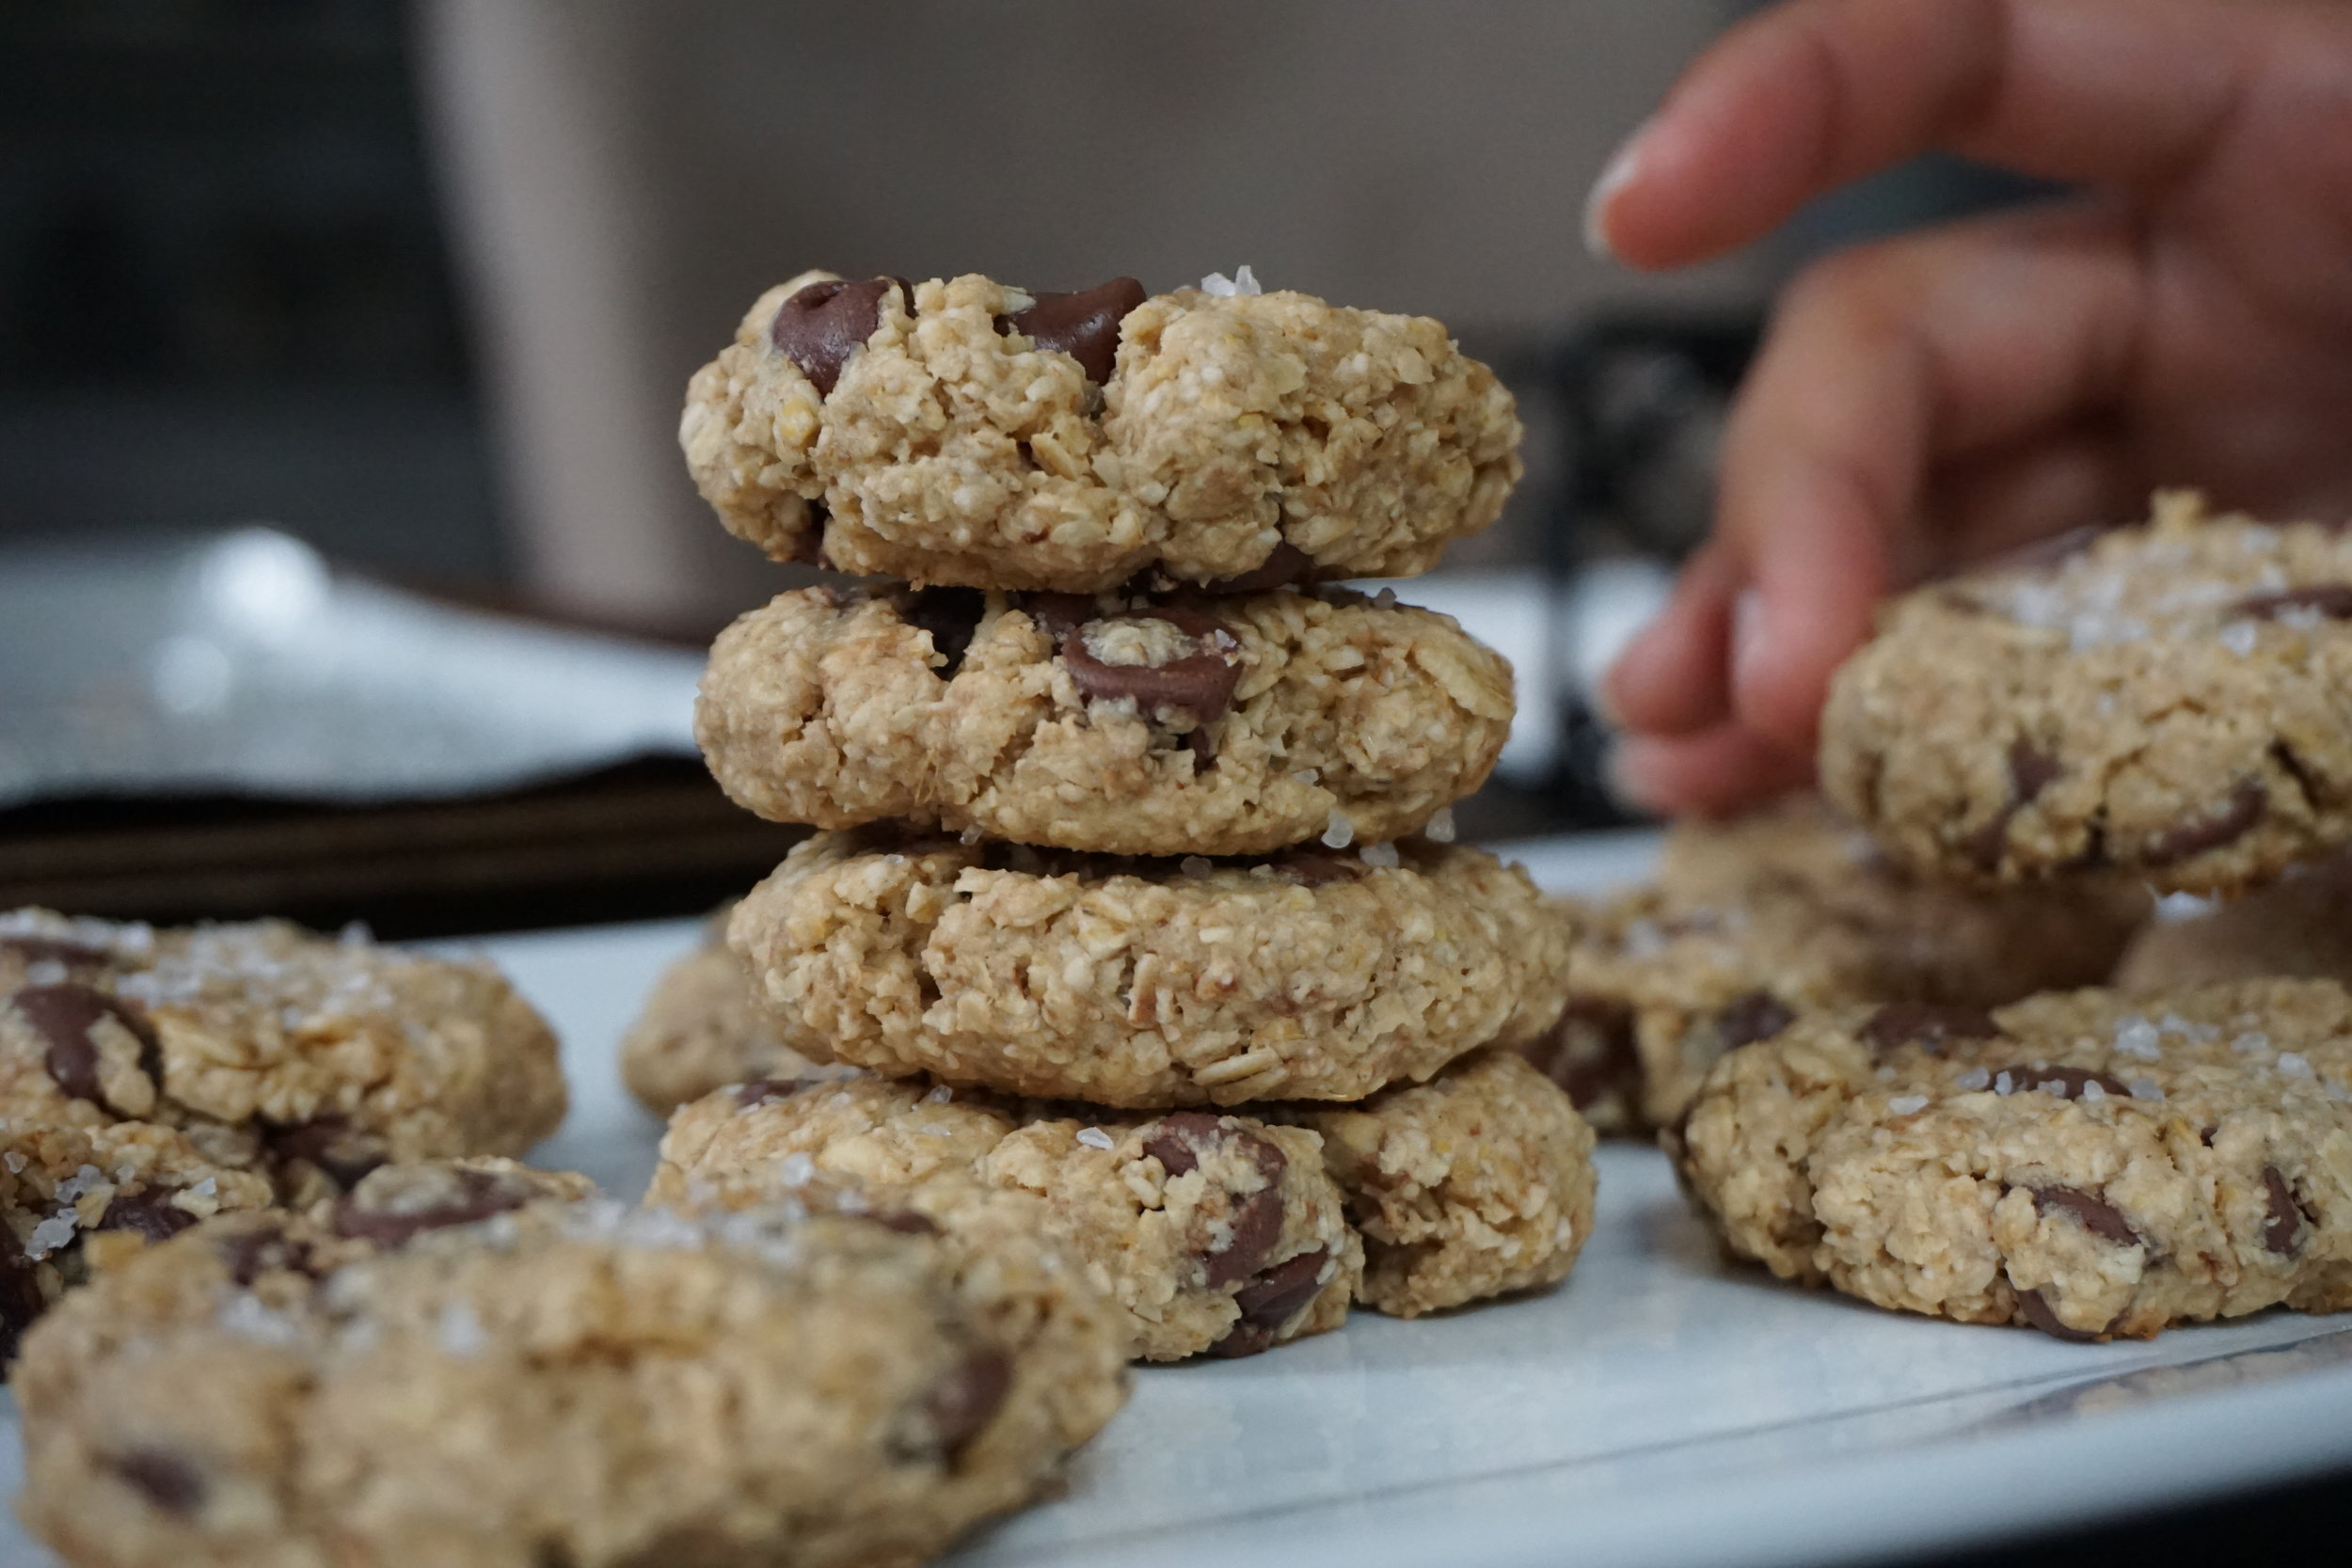
🤱🏻Breastfeeding Mama!! This one’s for you. I have tried a few lactation cookie recipes and they are typically packed with sugar or take a while to make, sometimes using equipment that you need to pull out of the pantry. Who has time for that?! Not this gal. So I came up with this recipe and it took me 35 mins total, including prep, cooking and cooling. It has only 1/4 cup of brown sugar which you can substitute with any sweetener you prefer. TIP: don’t omit the brewers yeast, oats or flax seed, that’s what helps with increasing or maintaining healthy milk supply. 🥛🍼🍪
P.S.🤰🏻Pregnant Mamas, whip up a batch and freeze them for post-partum if you plan to breastfeed. You’ll thank me later! 😬
P.P.S. Yes, your husband can enjoy them too. No, he won’t start to lactate 😂
Time: 30 minutes
Ingredients:
2 cups oats
1 cup all purpose flour
1/4 cup brown sugar
1 teaspoon baking soda
1 teaspoon ground cinnamon
4 tablespoons brewers yeast (I used Oat Mama)
2 tablespoons ground flaxseed
2 tablespoons apple sauce (or 2 eggs)
1 teaspoon sea salt
1 cup coconut oil (solid)
1 cup dark chocolate chunks or chocolate chips of your choosing
1 teaspoon vanilla extract
Recipe:
Mix all of the dry ingredients in a bowl (except for the chocolate chunks)
Mix the applesauce & coconut oil together with the vanilla extract.
Combine the wet & dry ingredients.
Add in the chocolate chips or chunks.
Form cookie shape & bake on 350 for 10-12 minutes.
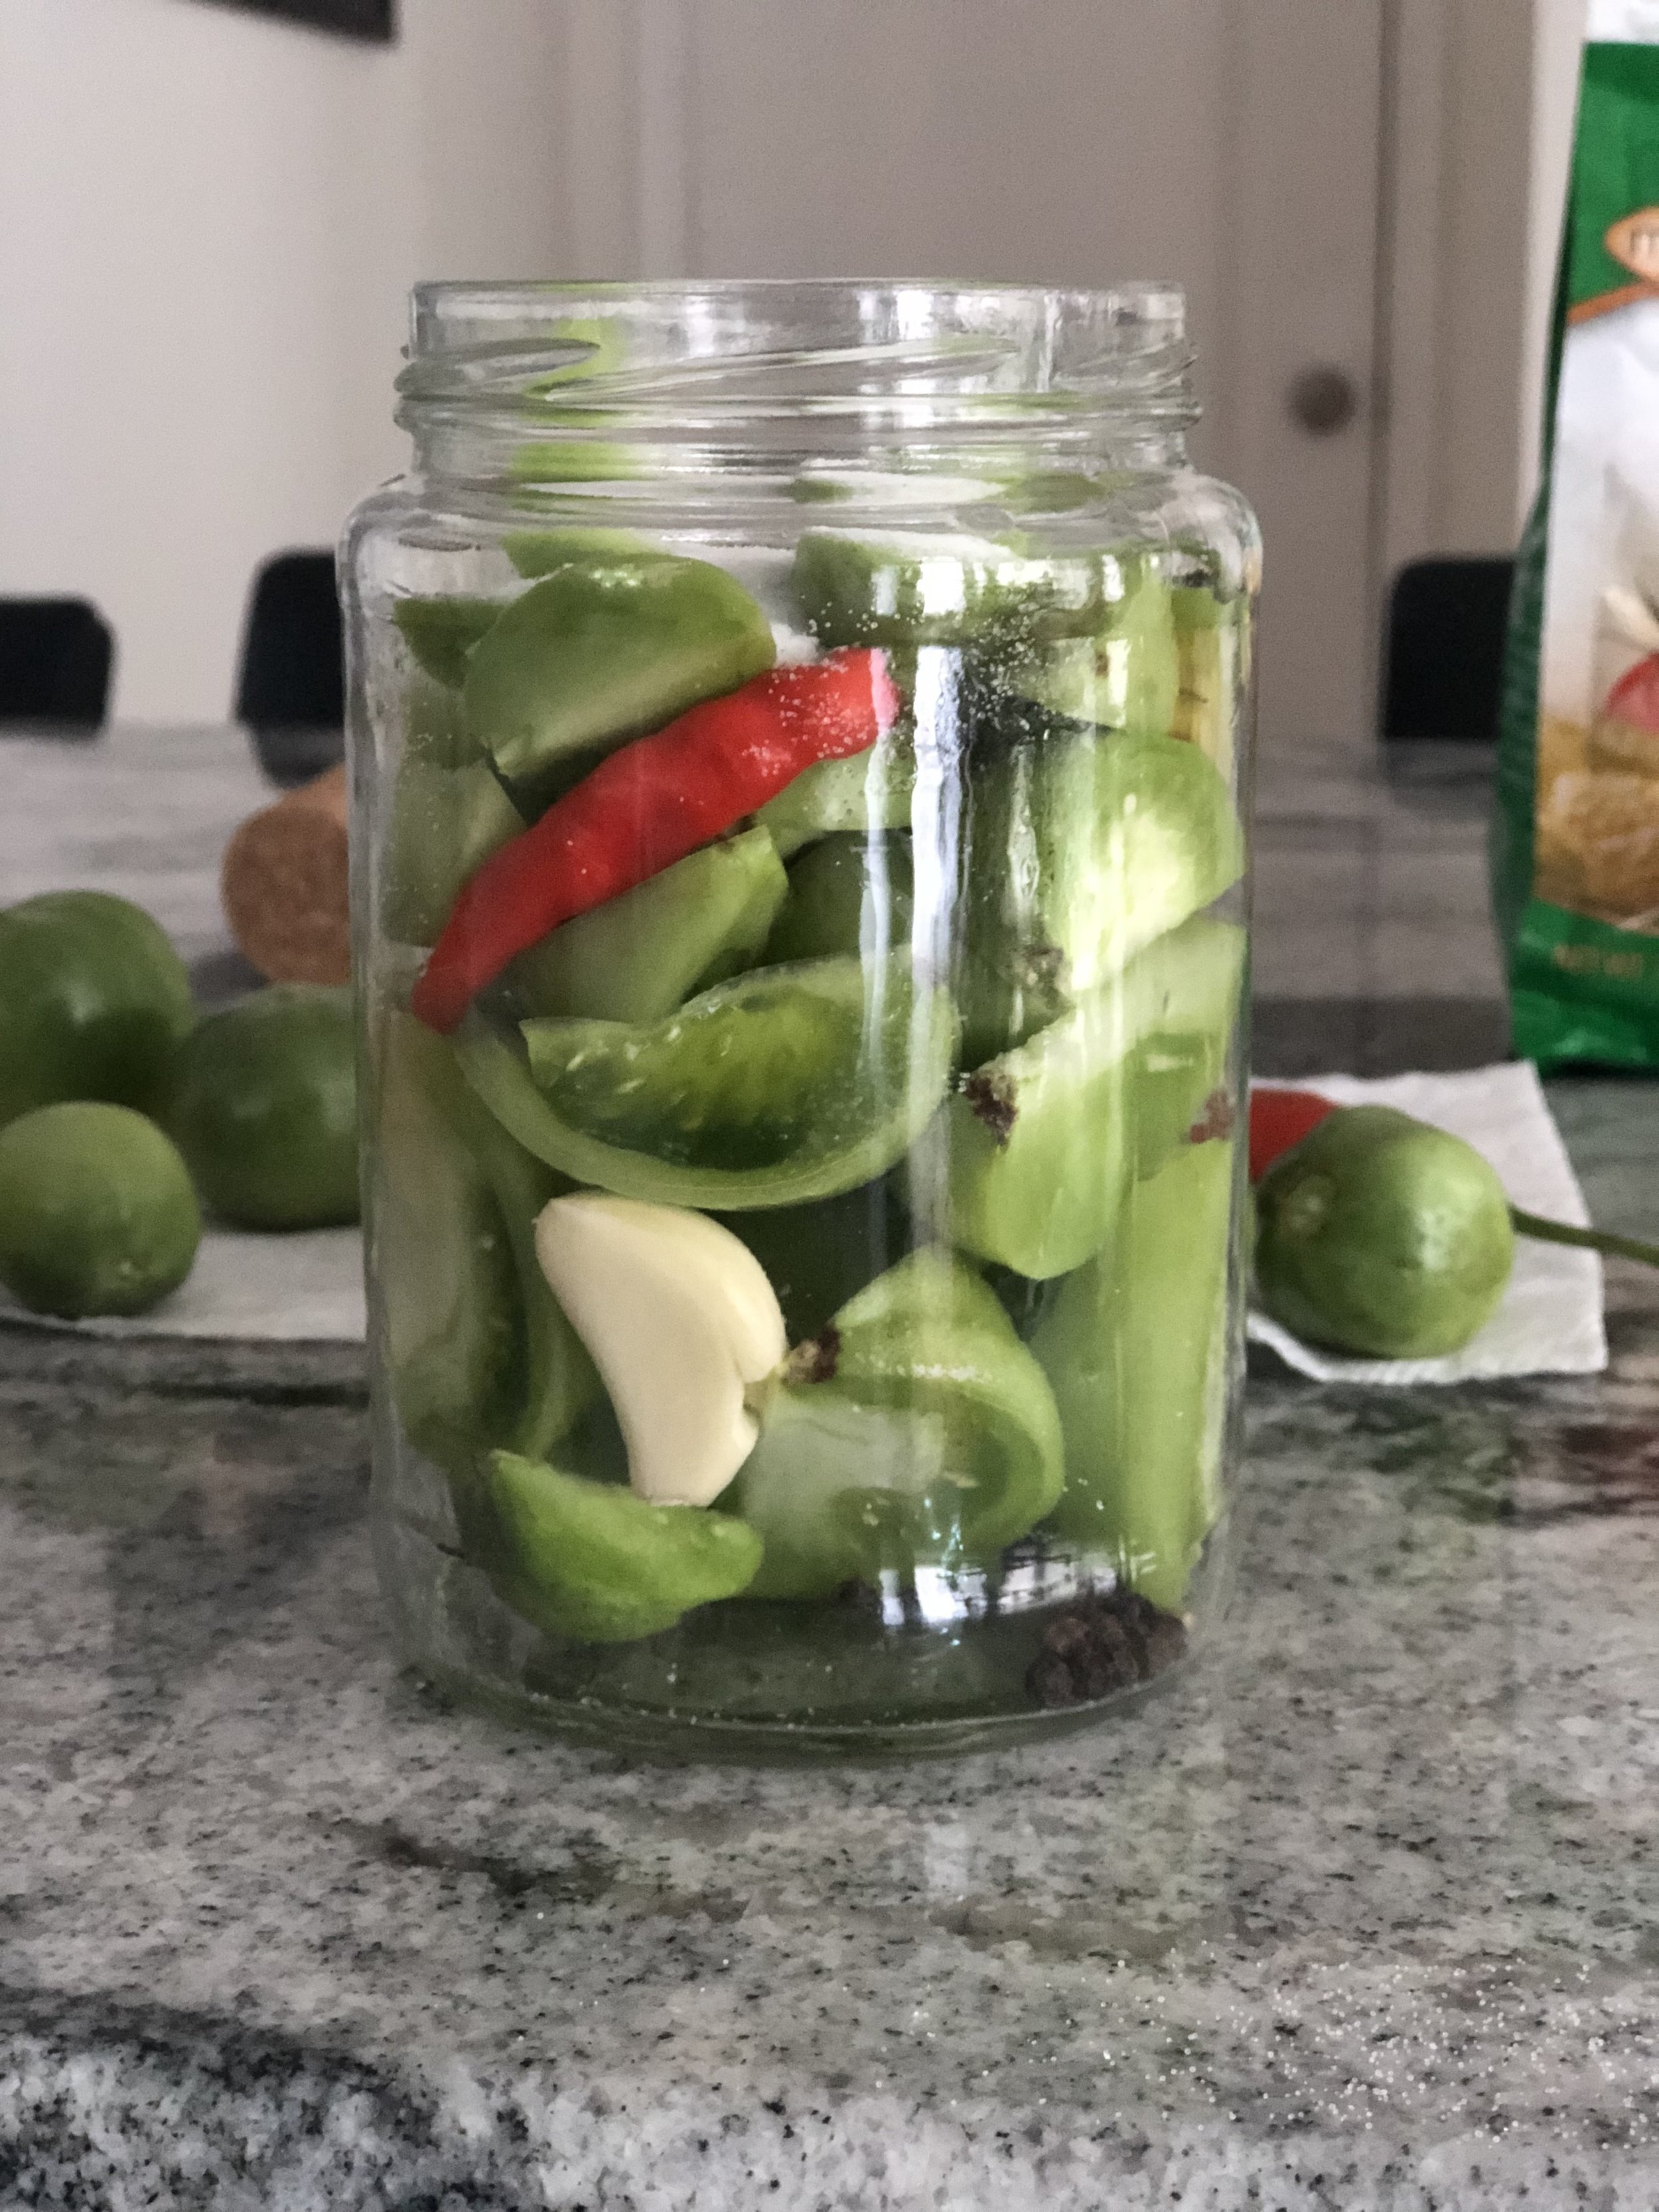
A fresh, crunchy way to preserve those end of season tomatoes that just won’t turn! Pickled green tomatoes are extremely easy to make & you probably already have the ingredients. We like to enjoy these with fried fish, fried chicken, eggs in the morning, BBQ chicken, basically anything that goes well with pickles!
Time: 15 minutes + time to cure
Ingredients to make one 10oz jar [amount of all ingredients to be adjusted based on the amount of jars you’re filling or how large your jars are]:
3 medium sized green tomatoes or a bunch of green grape/cherry tomatoes. Use the greenest ones, this won’t come out good if they have started to turn already.
1 part white vinegar
3 parts water
1 teaspoon black pepper kernels or a sprinkle of ground black pepper
2 cloves garlic
1 hot pepper (we used Thai chilis)
1 teaspoon canning salt (can sub kosher salt)
Reipe:
Cut the tomatoes into wedges, bite sized
Slice the garlic or smash it if you prefer to keep it whole
Boil the water & vinegar together
While the mixture is boiling, layer the tomatoes, garlic, black pepper & chili in the jar. I made this multiple times & sometimes I vary between slicing the chili up or leaving it whole. It’s more spicy when you slice it up so just be mindful of that
Sprinkle the canning salt in the jar
Place the jar in the sink & pour the boiled mixture into the jar. Cover it & use pot holder to lift the jar out of the sink, rinsing any spilled liquid away. I usually turn it over a few times to let the salt incorporate with the water/vinegar mixture.
Leave the pickled tomatoes in the fridge to cure. You can taste them as early as the next day but they are even better after about a week of curing!
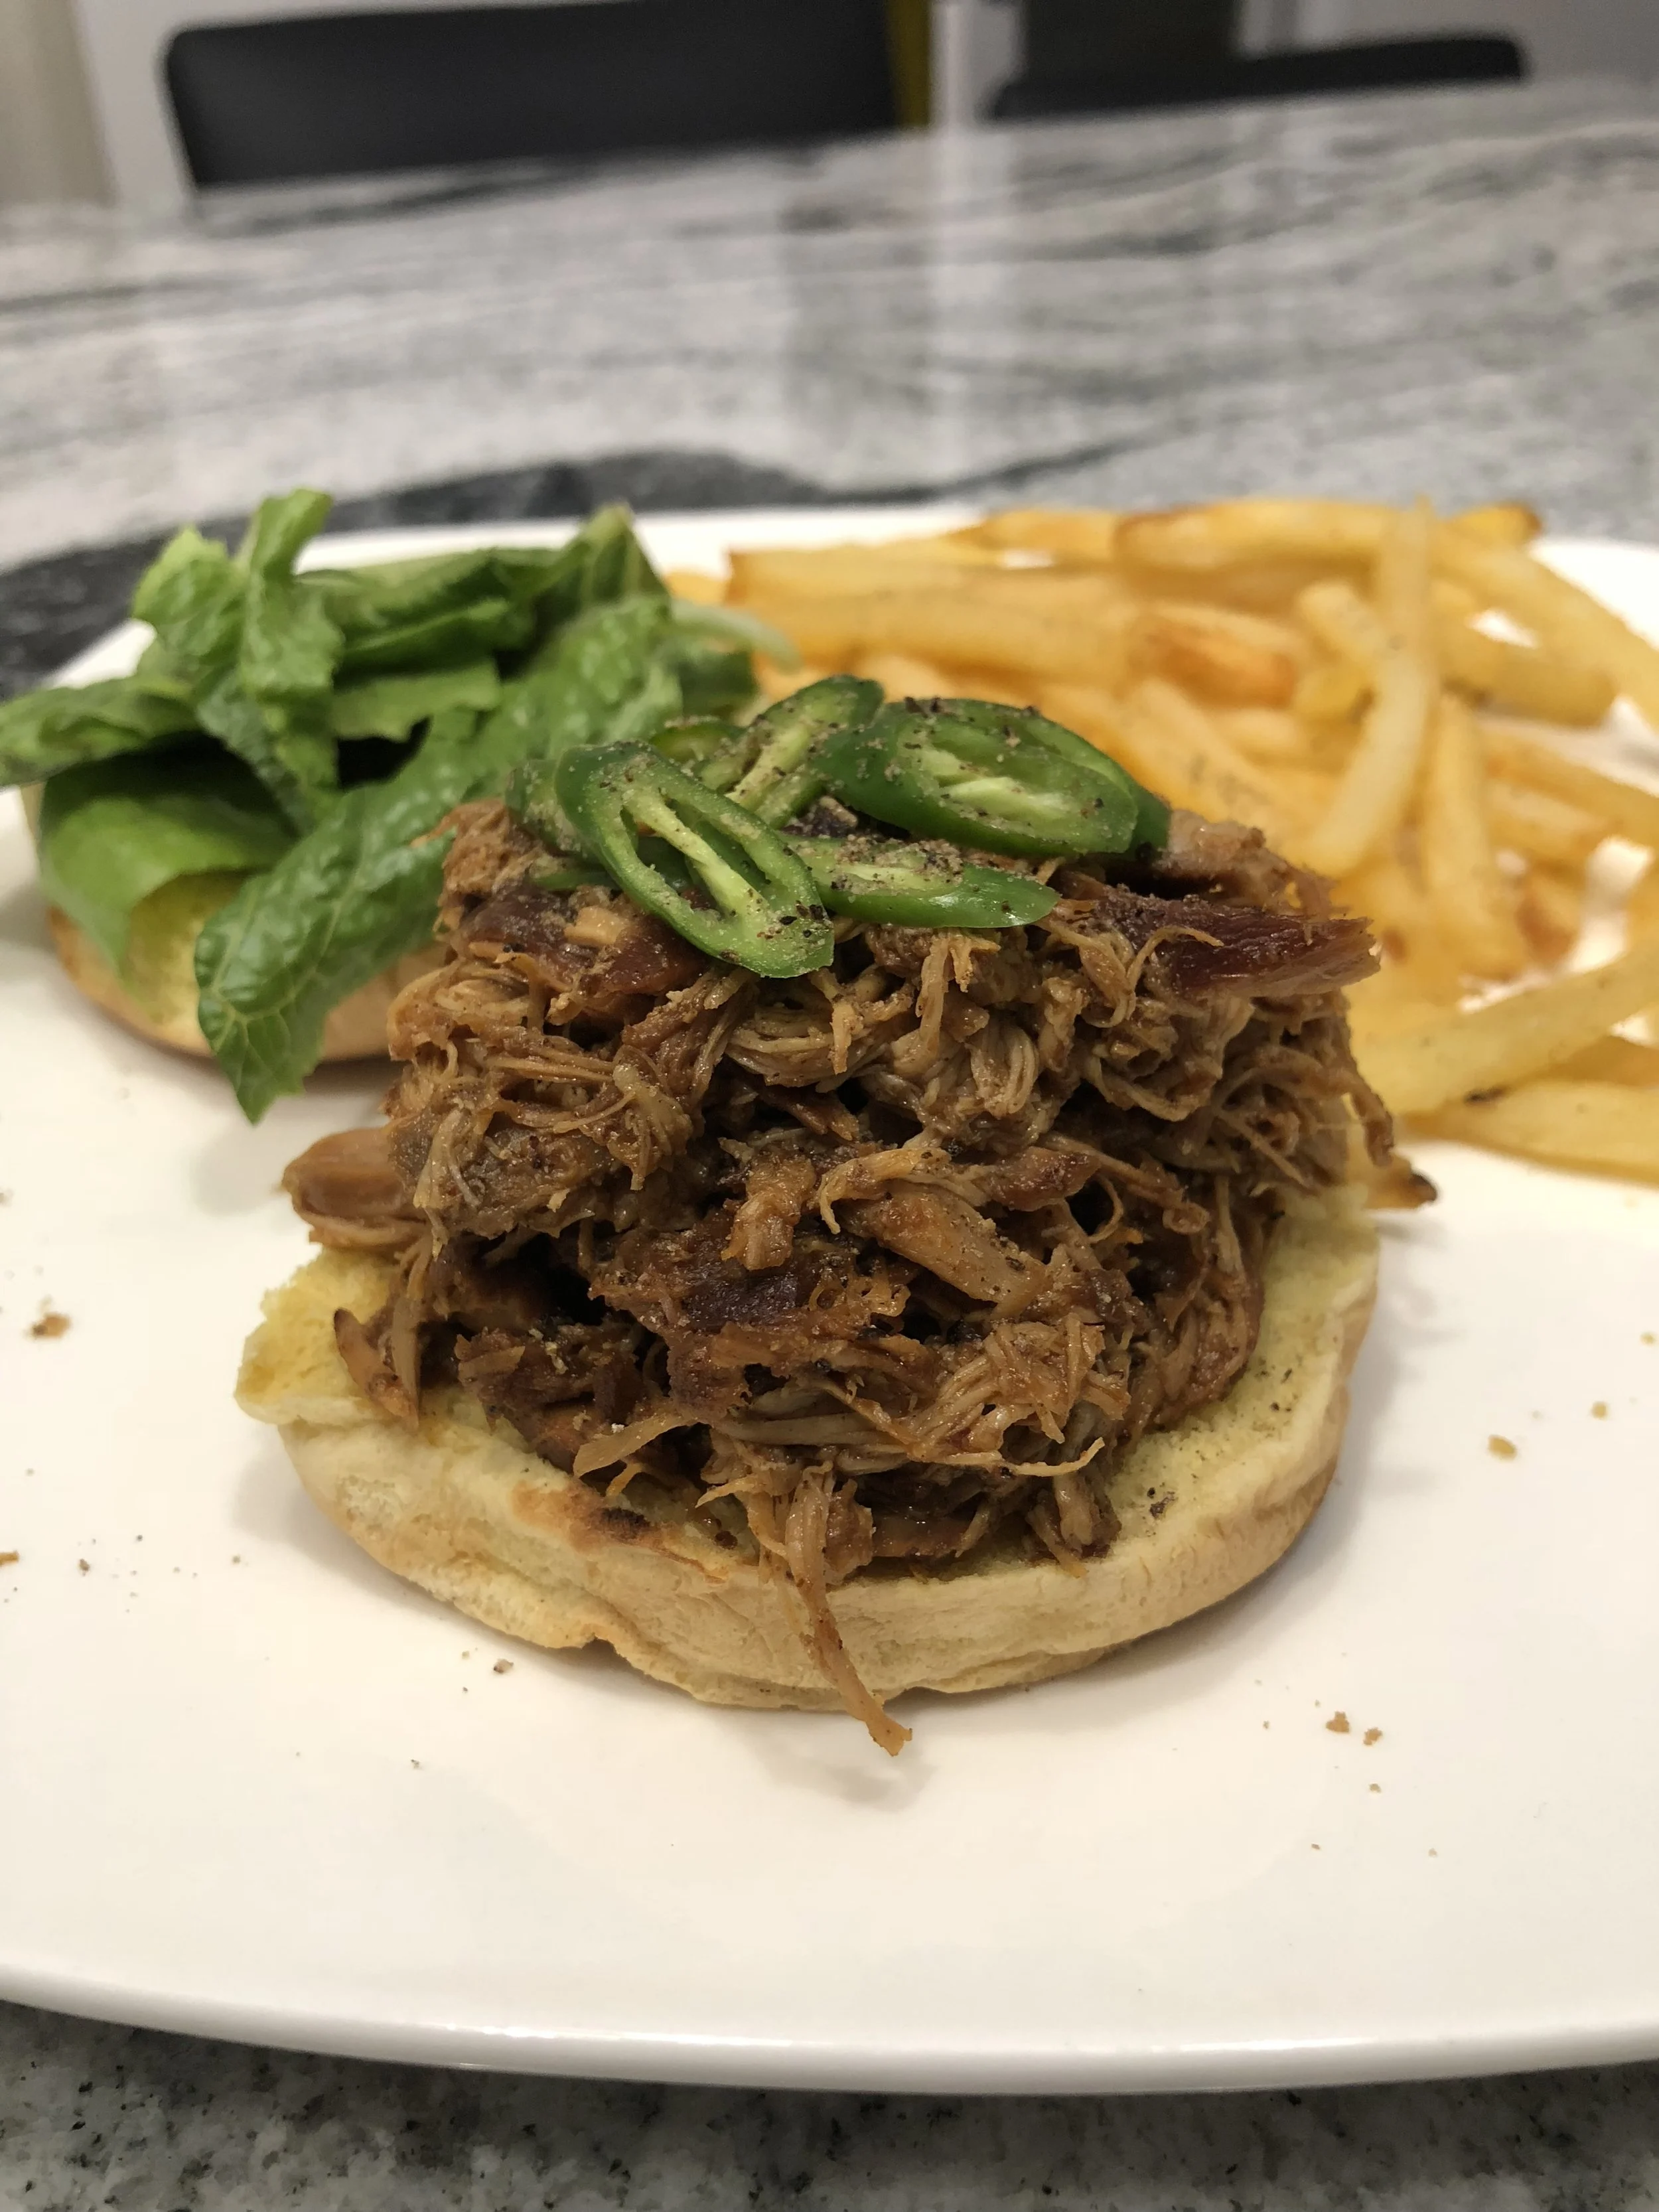
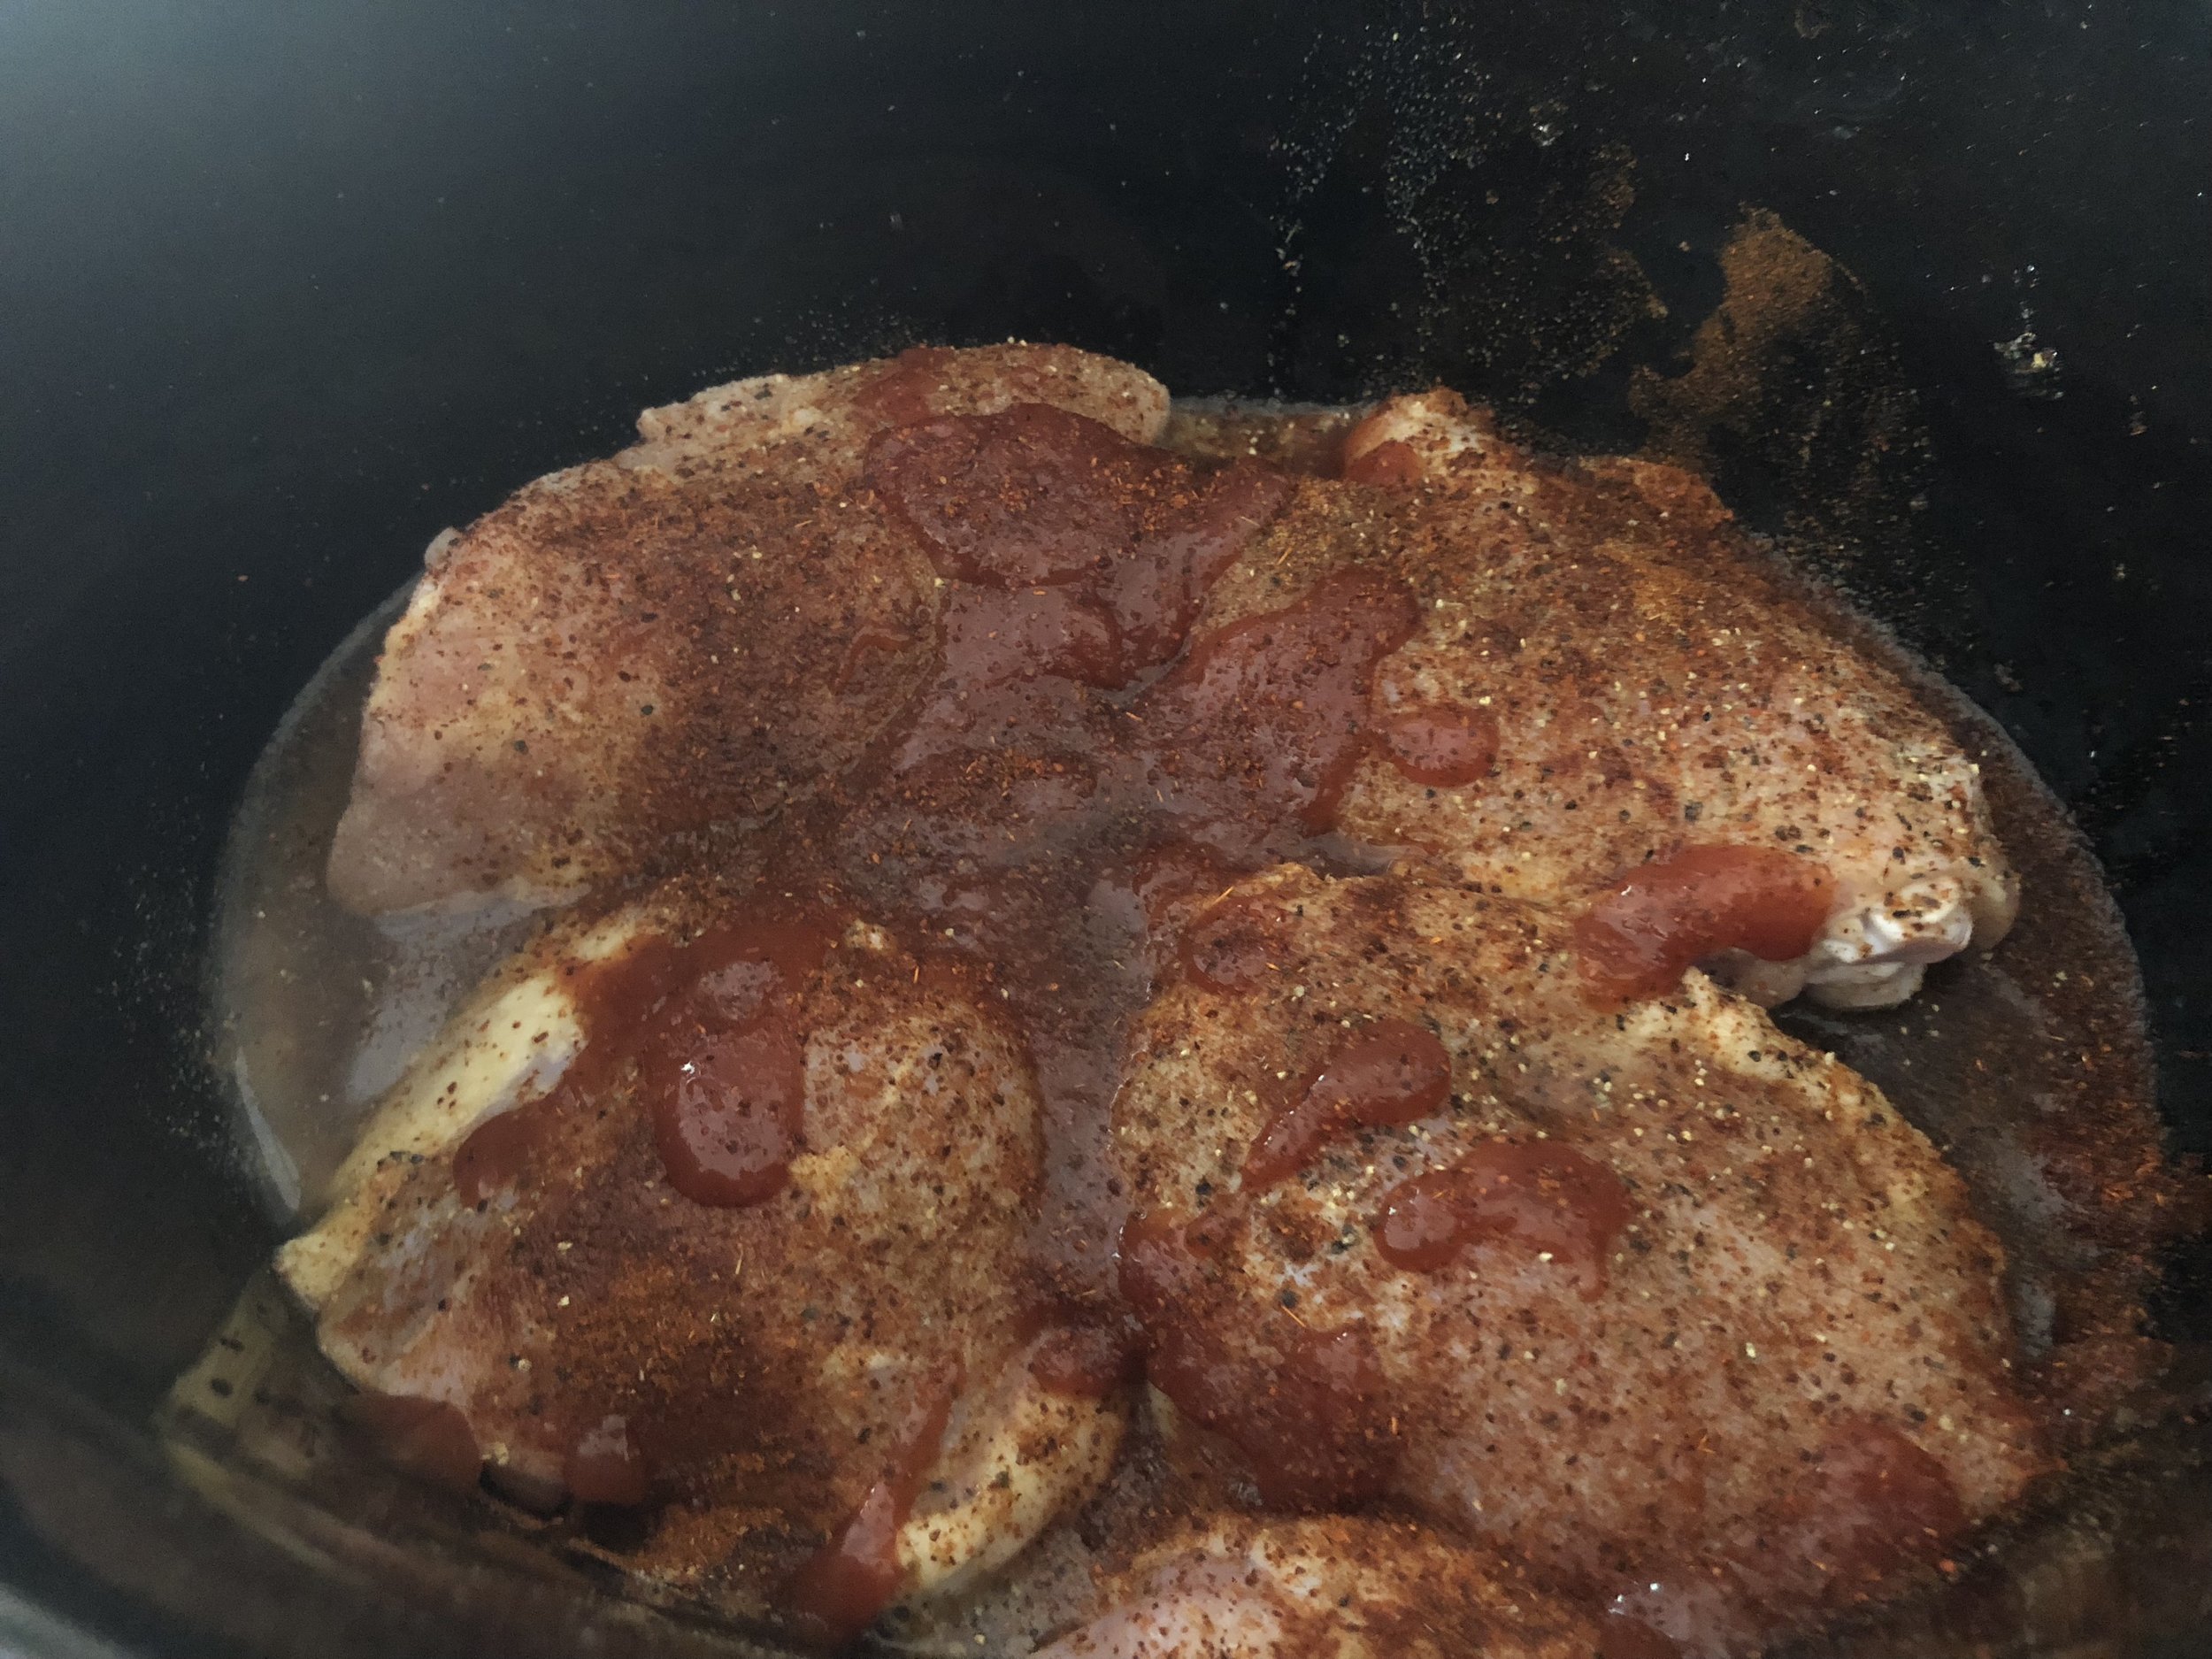
Who’s excited for football season to start?? Not me haha I don’t follow football but my husband does & he’s a huge Steelers fan. In honor of kickoff tonight, I slow roasted chicken thighs with a ton of seasoning in order to make pulled chicken sandwiches with baked fries for dinner! So full of flavor & so easy! I just seasoned the chicken with all of the ingredients for my homemade bbq sauce & let those flavors cook into the meat for 6.5 hours. Using the slow cooker is the best way to get this done, it’s ready by the time you come home.
Time: 10 mins prep, 6.5 hours cook time, 5 mins assembly
Ingredients:
4 chicken thighs, skin removed
2 tablespoons ketchup
1 tablespoon coconut nectar
1 teaspoon granulated garlic
1 teaspoon granulated onion
1 teaspoon chili powder
1 teaspoon ground cinnamon
1 teaspoon smoked hot paprika
1 teaspoon salt
1 teaspoon ground mustard
1 teaspoon black pepper
2 teaspoons white vinegar
1 teaspoon liquid smoke
Recipe:
Put the chicken thighs in your slow cooker & pour all of the above ingredients on top of them.
Turn the slow cooker on low for 6.5 hours & cover it. If you can, use tongs to turn the chicken over every 2 hours or so, so that the sauce coats evenly around the meat. It’s not necessary if you’re not home to do this step.
When the time is up, use tongs to remove the bones. The meat should break apart very easily, just use the tongs or two forks to break it. You should be able to mix it around so it gets coated in the sauce from the bottom of the slow cooker.
That’s literally all it is to it! Make a sandwich, little sliders, whatever you want.
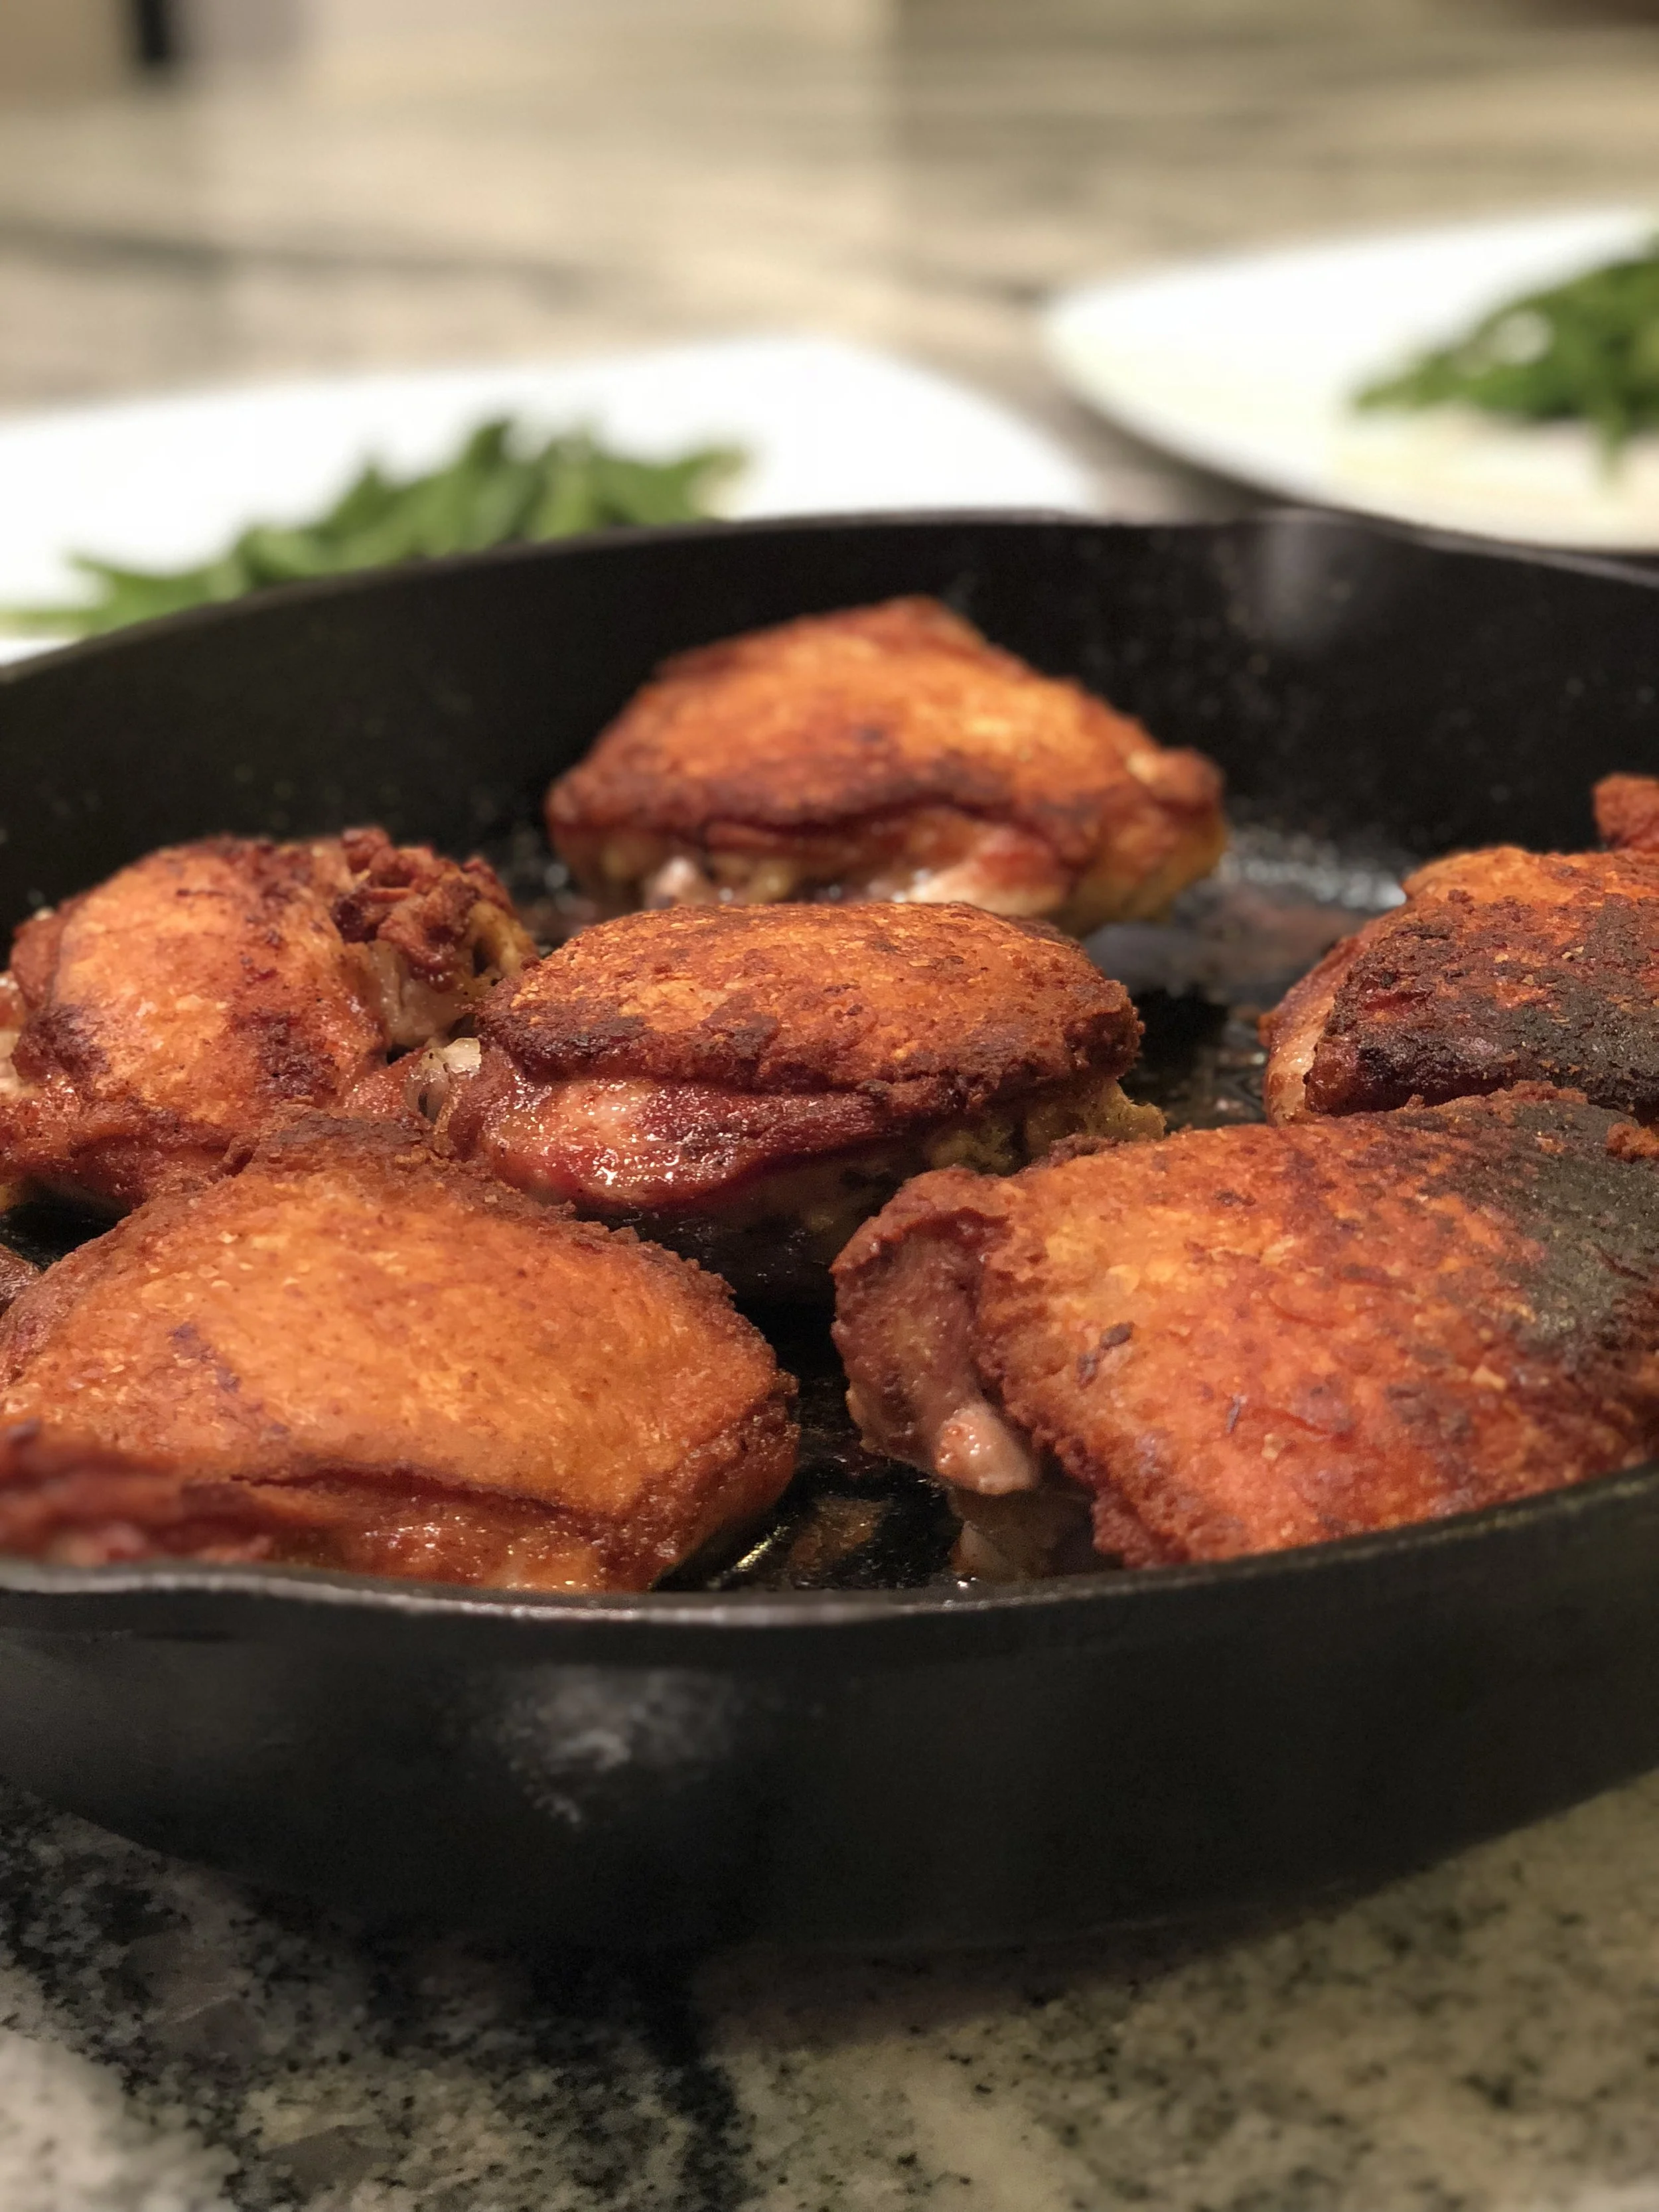
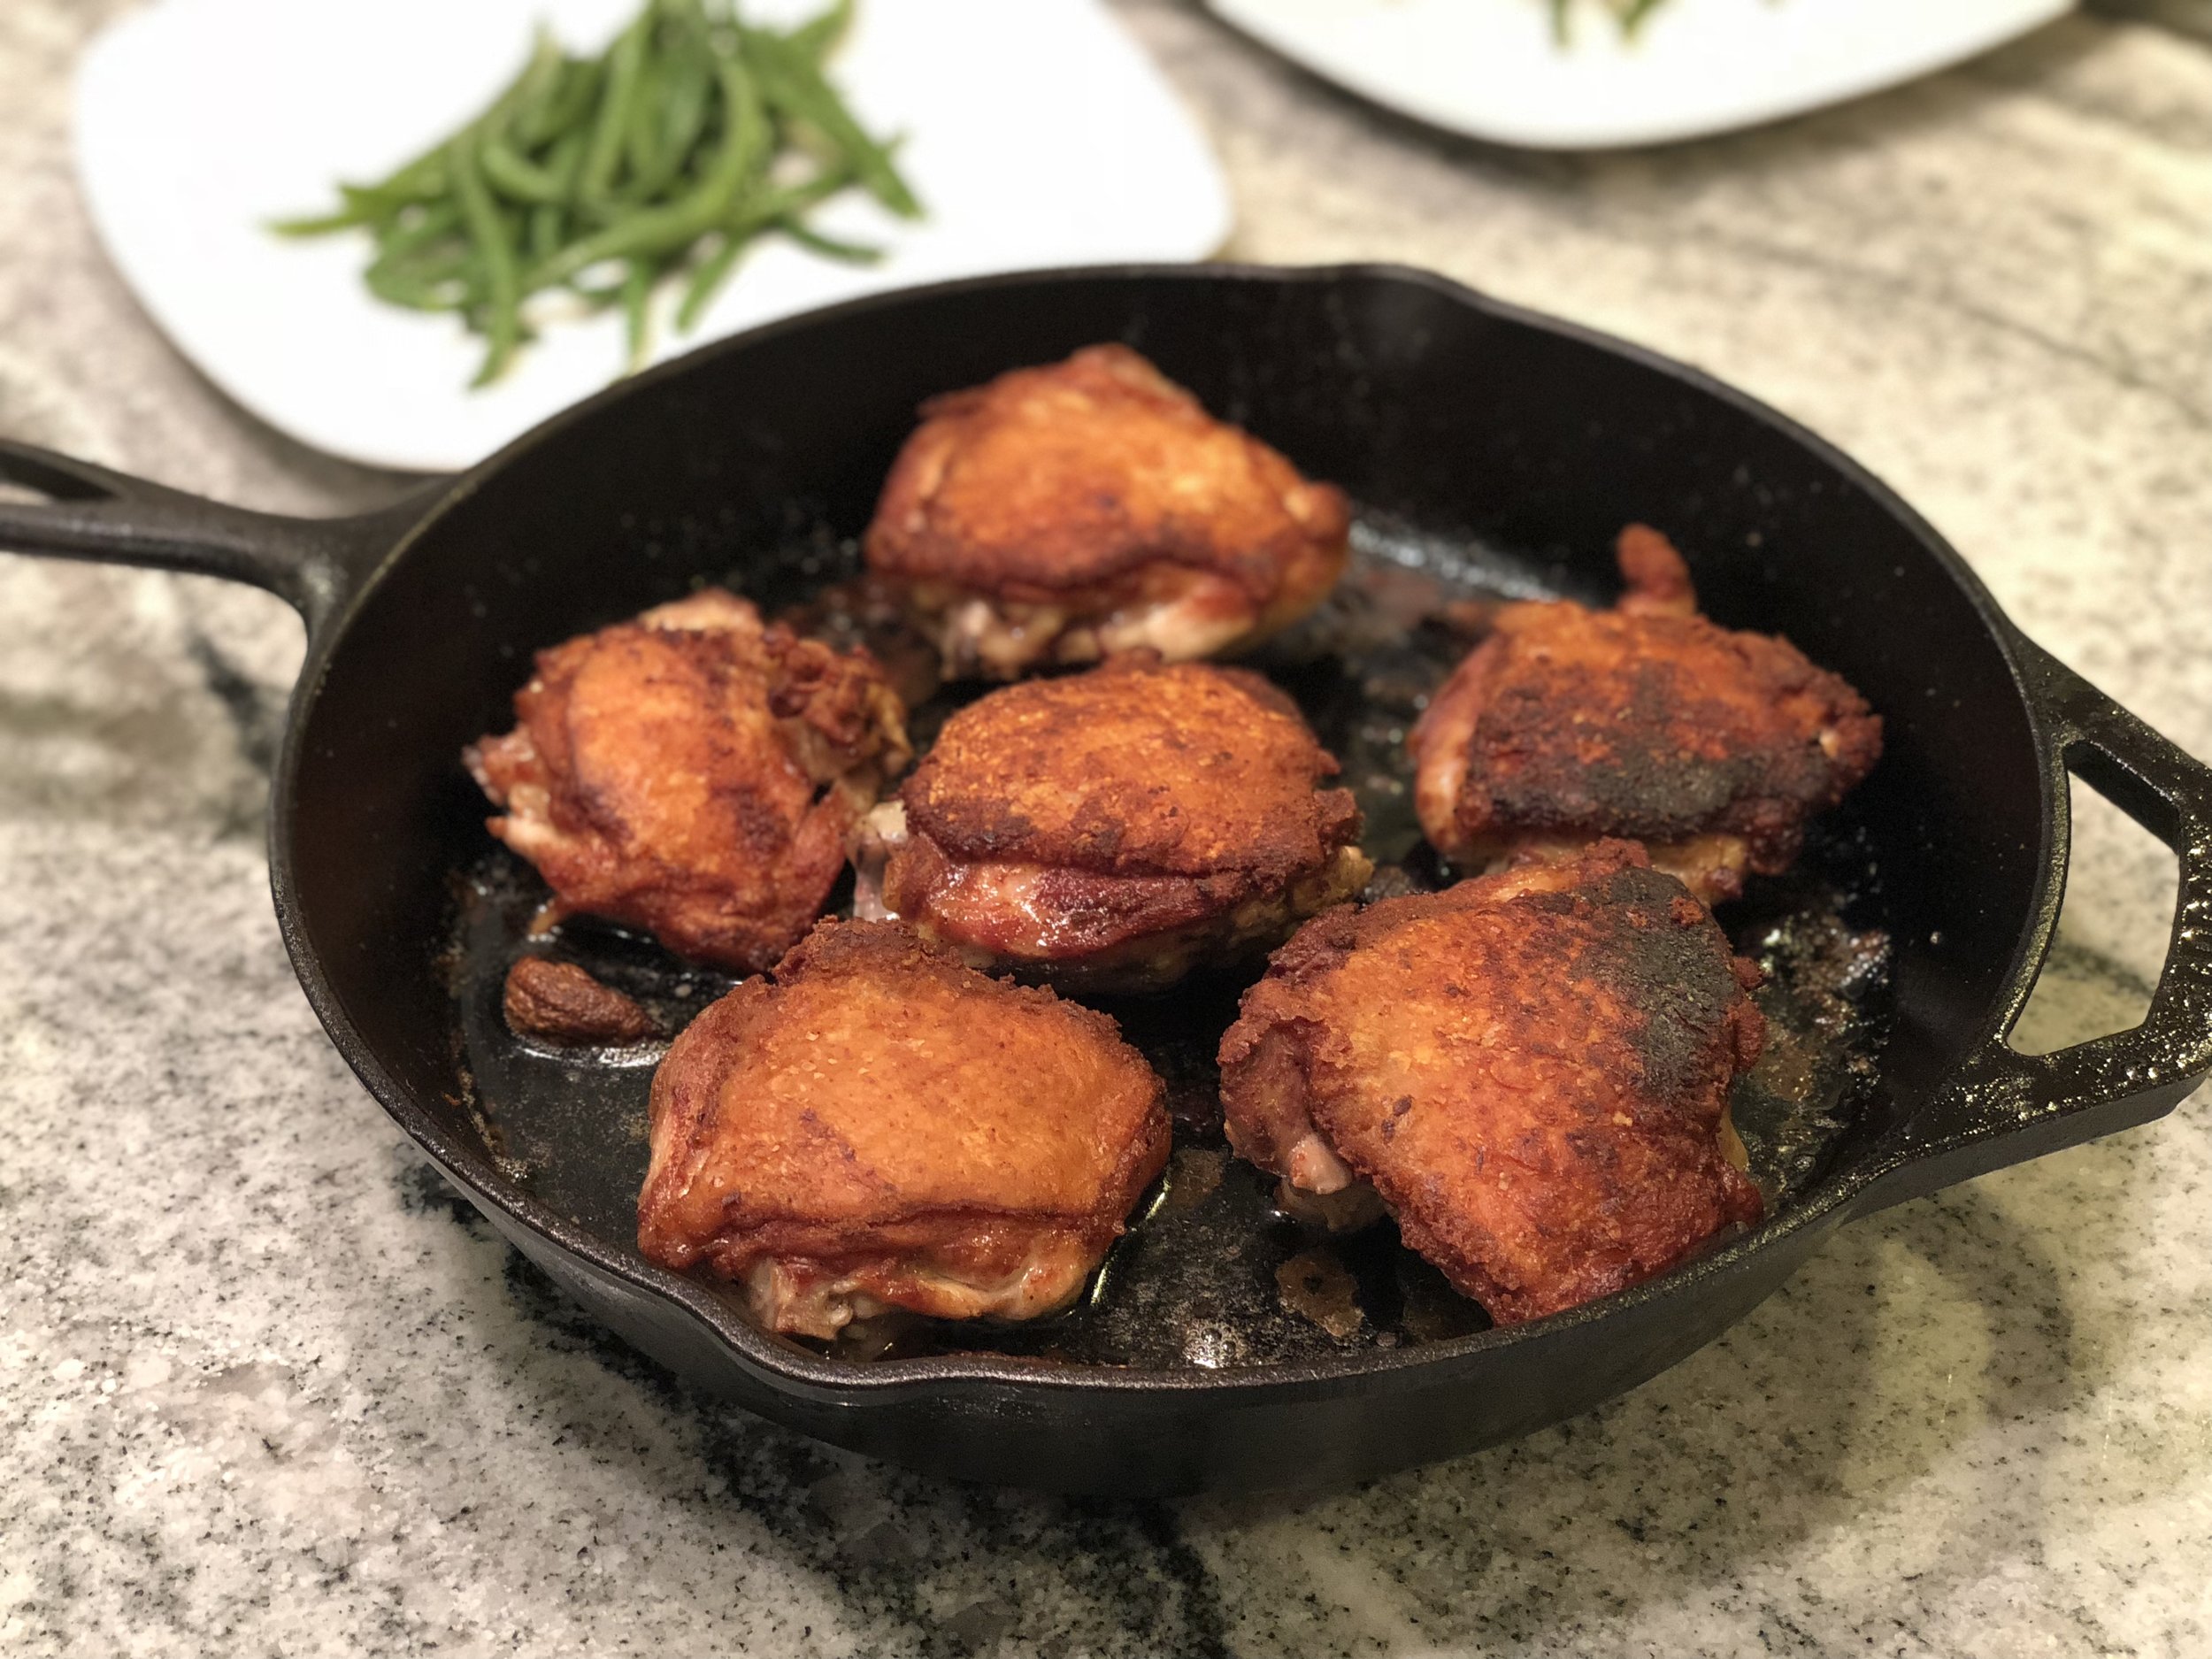
Crispy castiron chicken. Say that 5 times fast! I hadn’t tried this before but now that I did, I’m probably going to replace all of my fried chicken recipes with this. Probably. The thing is, it is so easy to execute that crispy skin while keeping a really juicy interior. And it’s done in 30-35 mins. And it isn’t fried which makes it healthier. So yea, no brainer.
Time: 35 mins
Ingredients:
6 bone in, skin on chicken thighs
1 tablespoon safflower oil (or any high heat oil)
salt & pepper to taste
1 teaspoon cayenne pepper (optional)
Recipe:
Get your castiron nice and hot on high heat. Yes, you need to use a castiron skillet for this process.
Add the safflower oil & give it 1 min to get hot.
Sprinkle salt & pepper on the chicken.
Use tongs to place the chicken skin-side down into the castiron.
Let it brown for 2-3 mins then turn the heat to medium. Leave it about 8 minutes.
While the chicken is cooking on the stove, preheat your oven to 475.
When the oven is preheated & the chicken is finished from the stove, place it into the oven. Leave the chicken skin-side down.
Bake for 10 minutes then take the castiron out and use the tongs to flip each piece over so the skin is on top. It should be nice and golden brown.
Place it back in the oven for another 3-4 minutes. This is just to ensure the other side is cooked through.
Remove & serve! At this time you can sprinkle on that cayenne pepper if you want it to be spicy.
It is really tasty with a mixture of white vinegar, chili pepper (we used wiri wiri) and a little fresh ginger sprinkled on top.
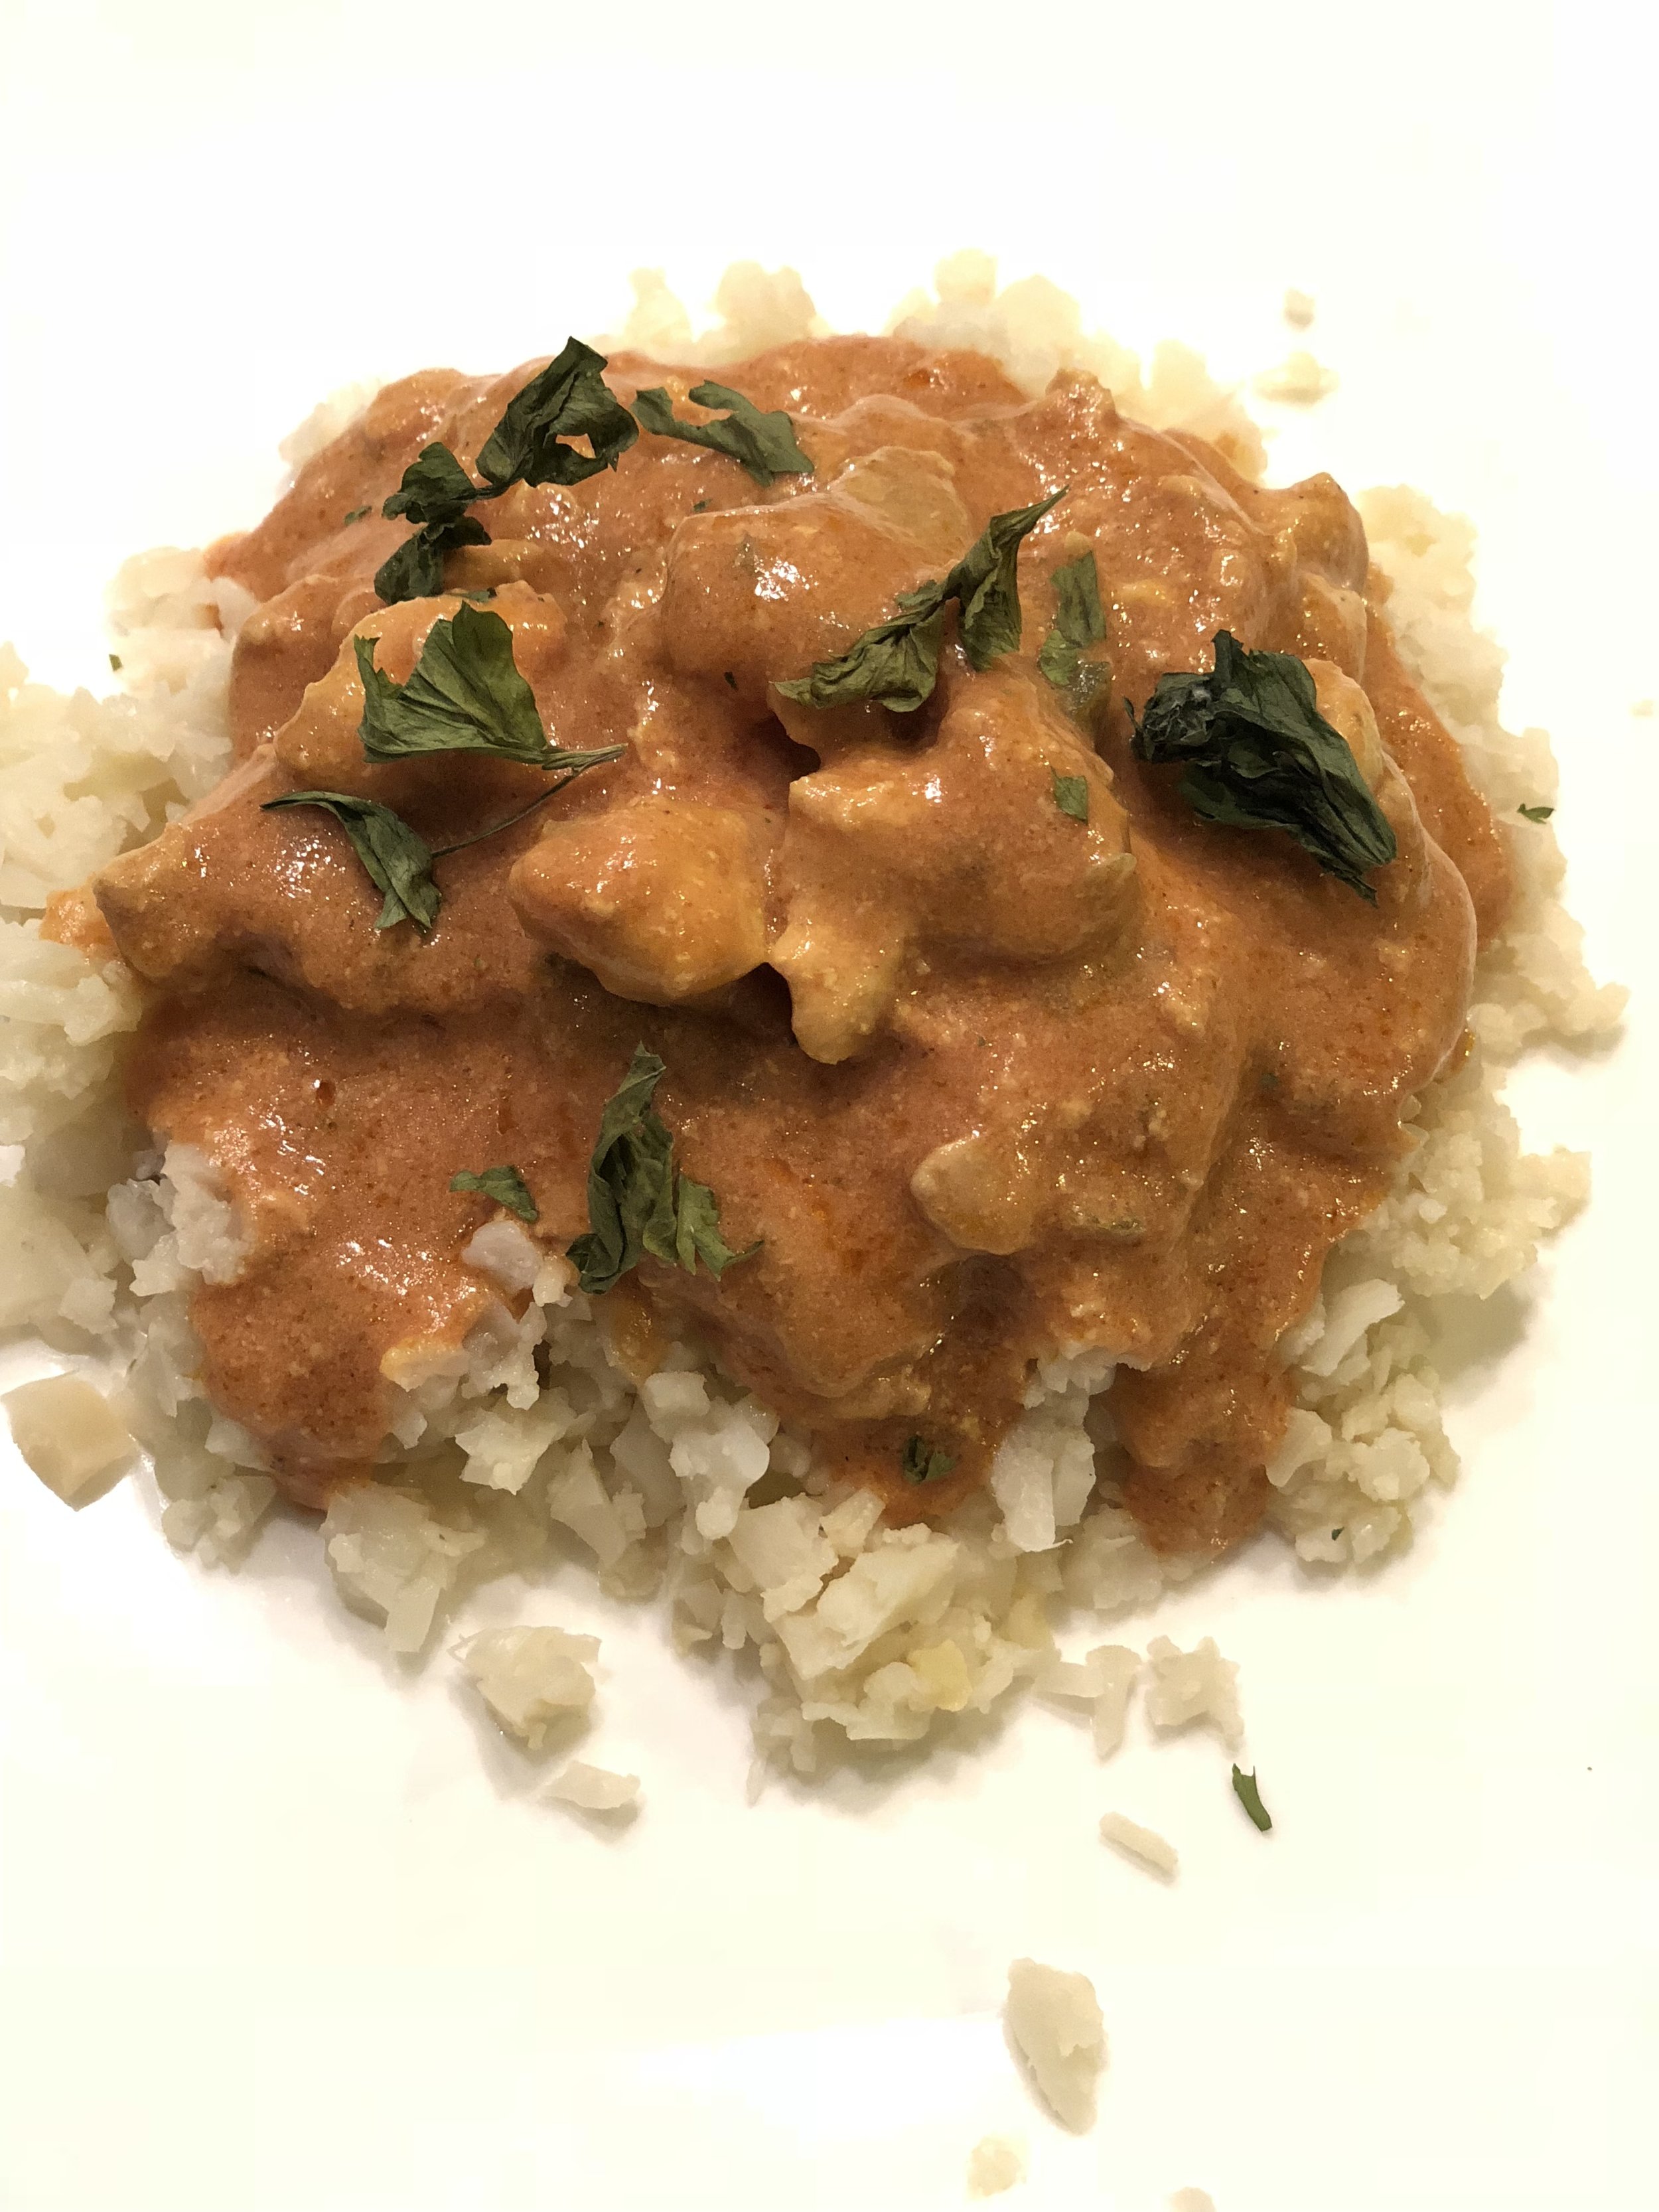
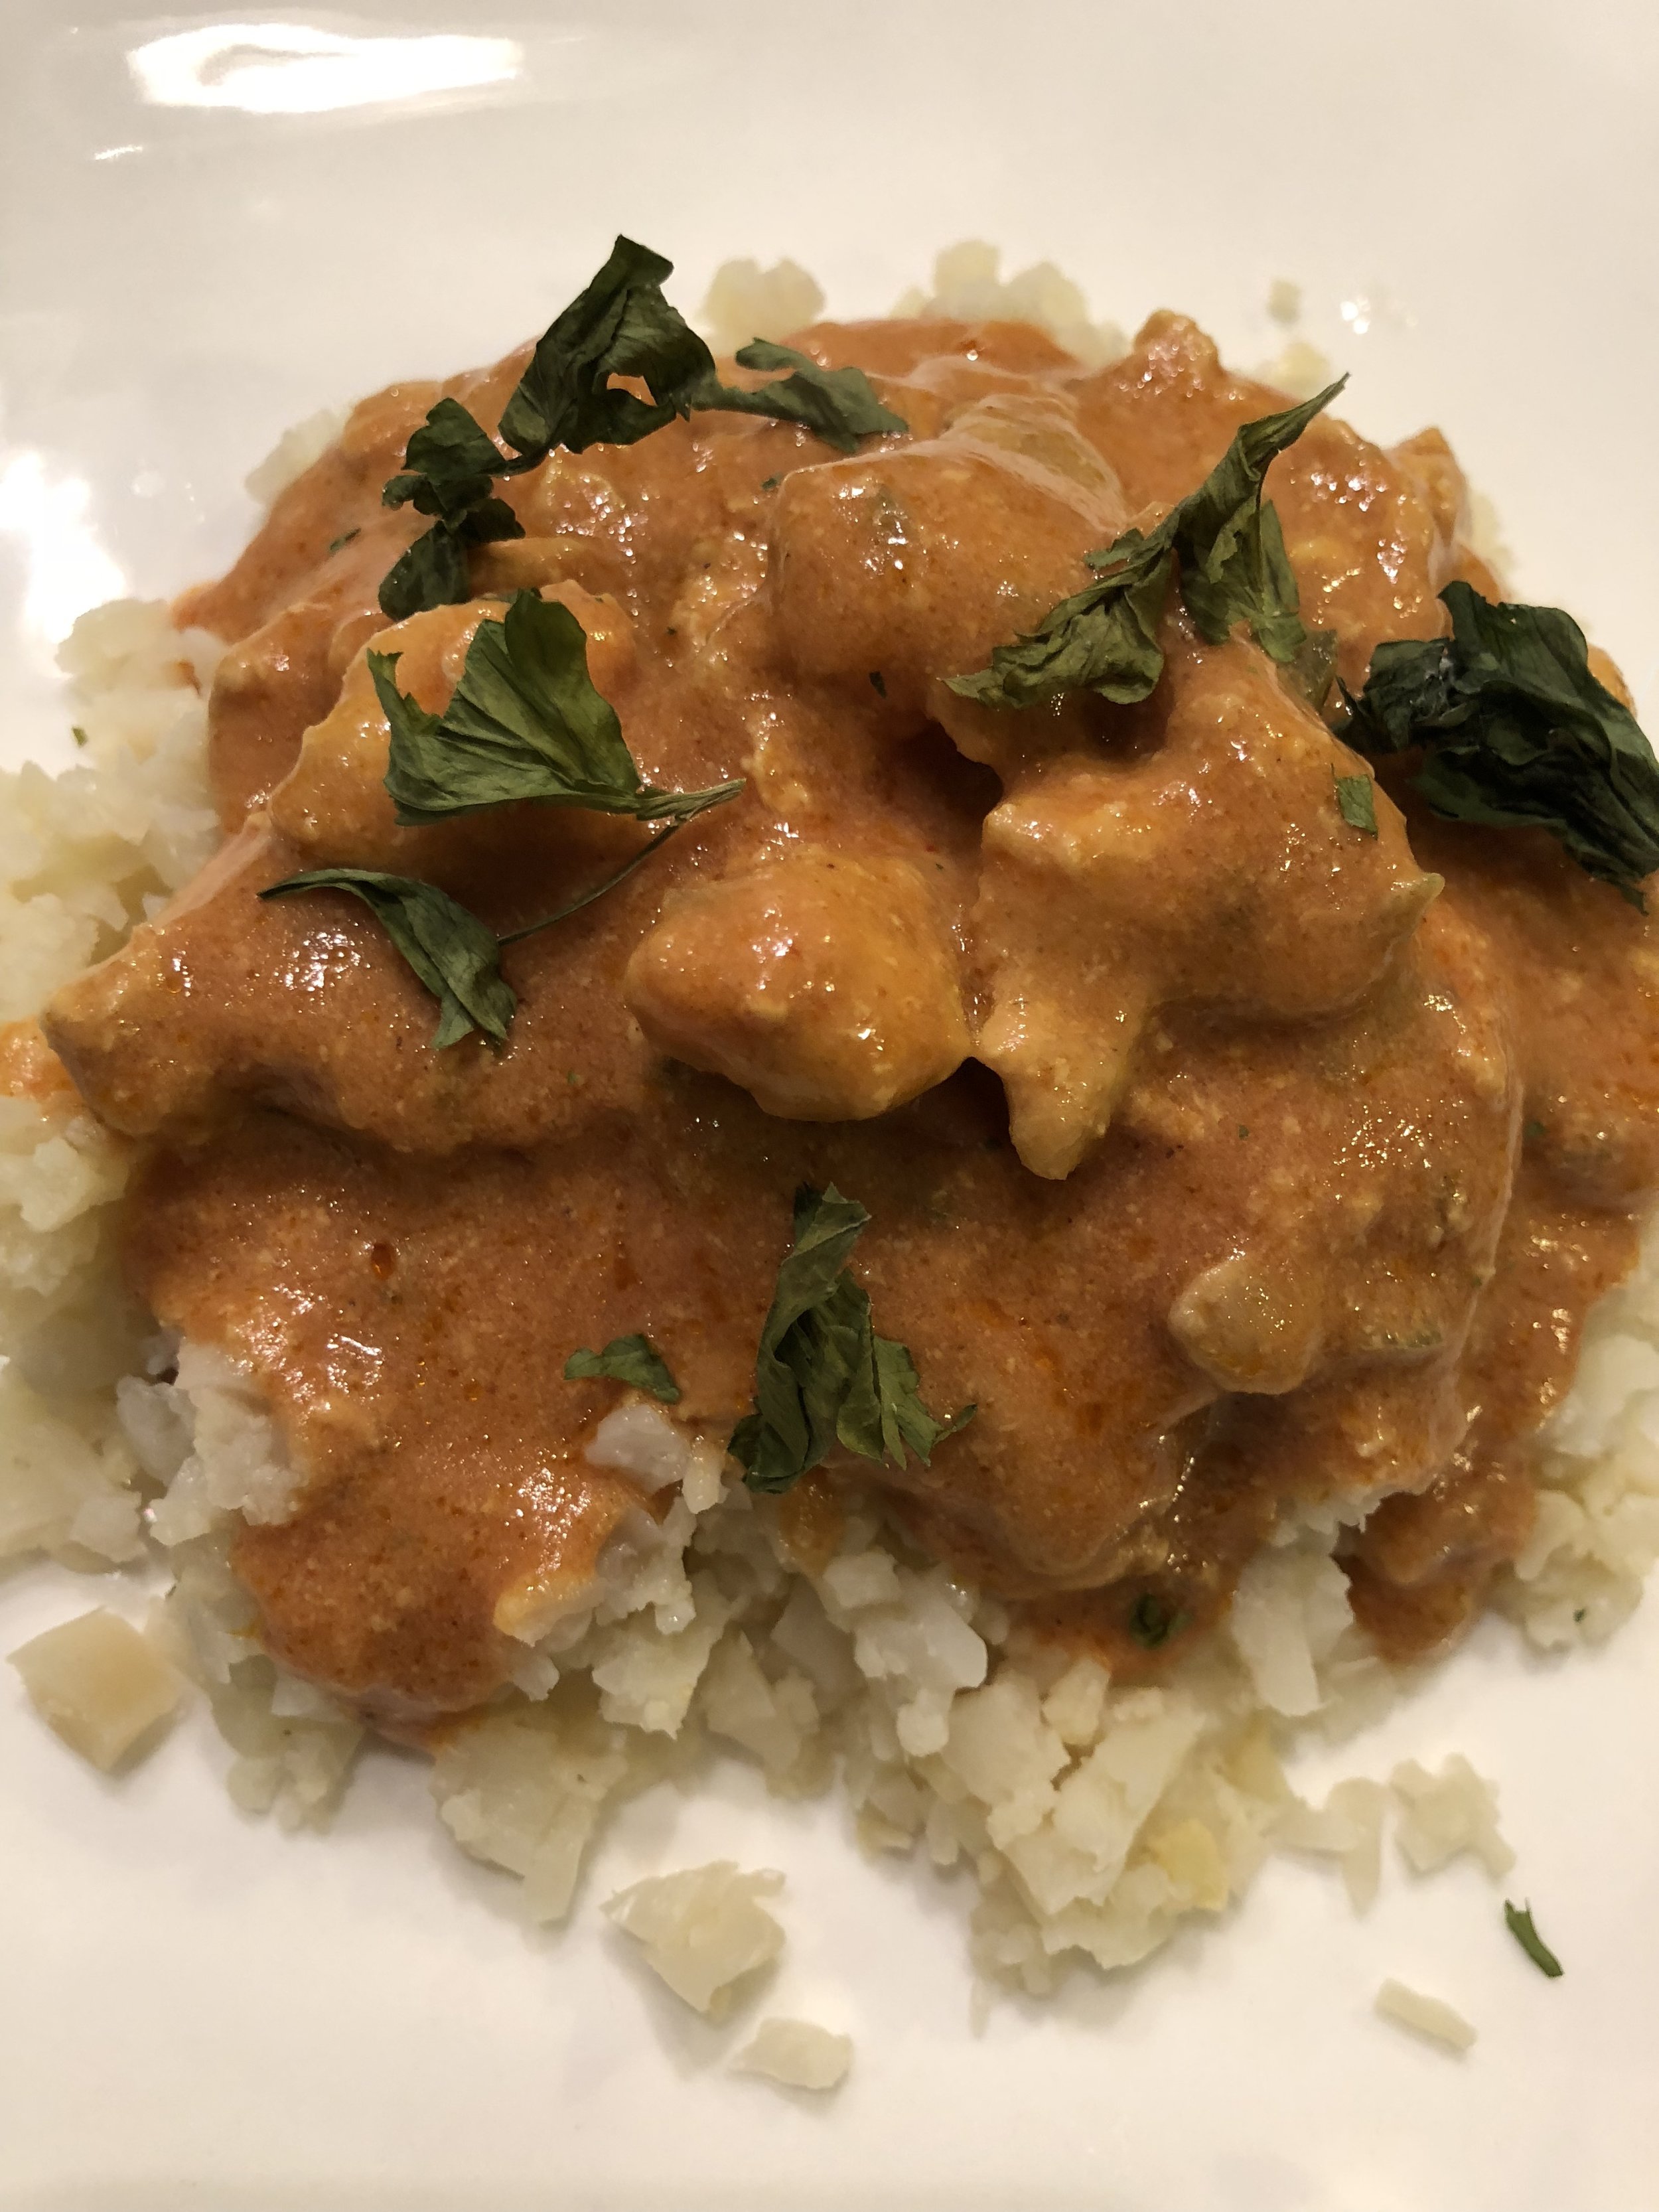
All I want when it’s cold outside is creamy, hearty, warm meals! I got sick of eating soup variations so I tried a recipe for Butter Chicken. It’s a little spicy, really creamy, packed with flavor, and I can have it with cauliflower rice which has been my new thing. Here’s my take!
Time: 30 mins plus time for the chicken to marinate
Ingredients:
1 cup plain yogurt (I used Greek)
1 tablespoon lemon juice
2 teaspoons freshly sliced ginger
2 teaspoons ground cumin
3 teaspoons ground cinnamon
1 teaspoon cayenne pepper
1 teaspoon black pepper
1 teaspoon salt
4 skinless chicken thighs, chopped into bite-sized cubes
1 tablespoon butter
1 teaspoon minced garlic
2 tablespoons chopped chili pepper, I used jalapeño
2 teaspoons hot paprika
1 teaspoon salt
1 cup tomato sauce, unseasoned
1 cup half & half (can use heavy cream)
1 tablespoon water
2 teaspoons corn starch (optional)
cilantro for garnish (optional)
Recipe:
Cut the chicken into cubes, removing any fat or skin, then add it to a large freezer / zip loc bag.
Add the yogurt, lemon juice, 2 teaspoons of the cumin, cinnamon, cayenne, black pepper, fresh ginger and salt.
Close the bag removing any air, and use your hands outside of the bag to move the chicken around the mixture so it coats evenly. Refrigerate overnight.
When you’re ready to cook the chicken, take it out of the bag with as little of the marinade as possible. Put it in a bowl & set it aside.
In a pressure cooker, add the butter, garlic and jalapeno. Let it sauté for a bit so the butter melts & the garlic cooks.
In a small bowl, add 2 teaspoons cumin, paprika, salt, tomato sauce and heavy cream. Stir to combine.
Pour the sauce over the chicken in the pressure cooker and cook for 5 mins. Let it release steam naturally for another 10 minutes before removing the lid. Hint: if you don’t have a pressure cooker, you can slow cook the mixture for 4 hours.
If using cornstarch to thicken the sauce, stir it into one tablespoon of water and add the mixture to the pressure cooker.
Halloween's got me surrounded by free candy and I am not likin it! Anyone else trying to cut their sugar intake? Welp, we gotta get creative. I tried making my own Reese's cups since I'm in love with them & I needed a healthier version. I'm so happy I did! Check it out, let me know what you think?
Time: 30 mins
Ingredients:
2 cups unsweetened cacao
1/2 cup unsweetened coconut oil
1 teaspoon sea salt
1 tablespoon agave nectar
1 cup almond or peanut butter
1 teaspoon vanilla extract
Recipe:
Melt the coconut oil then mix it with the cacao until its dissolved.
Add in the agave, sea salt, and vanilla extract.
Pour about 1.5 tablespoons of the mixture into muffin tins lined with cupcake liners.
Refrigerate the mixture for 2-3 minutes.
Microwave the almond butter for 1 min so it melts.
Pour 1 tablespoon of the almond butter into the cups on top of the chocolate mixture.
Pour enough of the remaining chocolate mixture over the almond butter to cover it.
Refrigerate for 15-20 mins until the "Reese's" harden. Enjoy!
Oh the subtle onion taste of leeks! You never disappoint! I haven't made this soup before but I'm really excited with how it came out. It's super easy and super impressive. Check out my take, below!
Time: 30 mins
Ingredients:
2 large russet potatoes
2 leeks, trimmed & cleaned
5 cloves of garlic
2 sprigs thyme
4 cups chicken bone broth
Salt to taste
8 tablespoons butter
Recipe:
Melt the butter in a large pot
Wash the leeks thoroughly, removing any sand. Then, chop them into smaller pieces & add them to the pot.
Smash the garlic cloves & add them in with the leeks.
Peel & dice the potatoes into small pieces, add them to the pot.
Add the thyme, salt & bone broth. Stir to combine, then cover the pot.
Let the soup boil until the potatoes are tender, about 20 mins.
Use an immersion blender to smoothen the soup. Test for salt, then serve!
What's better than sautéed squash, mushrooms & carrots coated in melted gruyere? Not much. This vegetable raclette is wholesome, filling, and a little spicy. In other words, it's perfection.
Time: 1 hour
Ingredients:
2 large zuchini
2 summer squash
1 pack portobello mushrooms
1 serrano pepper
1 cup shredded carrots (or diced)
1/2 cup shredded gruyere cheese
salt & pepper to taste
1-2 tablespoons olive oil
Recipe:
Dice the zuchini & summer squash, roughly chop the mushrooms.
Slice the serrano pepper & set it aside.
Sauté the vegetables (including the carrots) in a bit of olive oil so they will cook through. I did mine one by one so that everything cooked evenly & didn't get too soggy. You want them crunchy.
Pour the cooked vegetables into an oven-safe Pyrex, add the serrano slices & season with salt & pepper.
Sprinkle the shredded gruyere on top of the vegetables & broil for 2-3 minutes or until the cheese is melted & bubbly.
Homemade ice cream can officially be crossed off my list of fears. Hahah I'm almost kidding! I don't have an ice cream maker so this was pretty intimidating for me. I made this recipe eggless, surprisingly not all ice cream is, so it's great for me on fasting days when I don't eat meat, fish, poultry, or eggs. After trying it, and being excited with what it tasted like, I'm here to tell you that you can put those fears to bed. Get em out of your house alltogether. I'm serious, it was so easy! I want to explore all the flavors now!!
Here's my Mint Chocolate Chip:
Time: 6.5 hours
Ingredients:
2 cans coconut milk (full fat)
1 can sweetened condensed milk
1.5 teaspoons peppermint extract
1 teaspoon vanilla extract
green food coloring (optional)
1 tablespoon coconut nectar (as a sweetener)
dark chocolate chunks
Recipe:
In a medium-sized pot, combine the coconut milk & condensed milk.
Mix in the food coloring, a couple drops at a time until you get the desired green.
Let the mixture come to a boil then drop in the extracts and turn off the heat.
Allow the mixture to cool completely before mixing in the chocolate chunks. I chopped my chunks smaller so you get a bit of chocolate in every bite.
Pour the ice cream into a freezer safe container & press clear wrap over the top. Then, freeze for at least 6 hours.
Enjoy with a warm fudge brownie for an extra sweet treat!
Fasting for Navratri has never been easier! We had guests this past weekend, my cousins from Orlando [heart emoji] and they love football. So you can imagine the desire for wings & football food. I was determined to make a bunch of snacks that would satisfy the wings cravings but be meatless, eggless, and somewhat healthy. Challenge accepted.
Time: 30 mins
Ingredients:
1 head cauliflower cut into florets
1/2 cup Franks red hot sauce
3 tablespoons butter (we used a butter substitute)
1/2 cup all purpose flour (can use rice flour for a glutenfree version)
1/2 cup water
salt & pepper to taste
Recipe:
In a large basin, mix the flour & water together, seasoning with salt and pepper. You want it to be a batter, so add more flour or water as needed.
Dip the raw cauliflower into the batter & place it on a cookie sheet lined with parchment paper.
Bake the battered cauliflower on 450 for 10 mins.
While the cauliflower is baking, mix the hot sauce & butter together.
Remove the pan from the oven, then liberally brush the buffalo sauce on each one using a pastry brush.
Place the cauliflower back into the oven for another 20 minutes.
Enjoy at room temperature, they're not as good when super hot. These are great with ranch dip!
Who else loves the hearty, creaminess of Spinach & Artichoke dip? Want an eggless version? Look no further!! This recipe will take you 20 mins tops & has 5 simple ingredients.
Time: 20 mins
Ingredients:
1 box frozen spinach
1 can artichoke hearts
1/2 cup plain unflavored yogurt (can sub sour cream)
1/3 cup cream cheese
1/4 cup grated parmesan cheese
Recipe:
Strain the spinach in two layers of towels, you want as much moisture out of it as possible.
In a large bowl, mix the cream cheese, yogurt, cheese, and the spinach. You don't need to add salt because the cheese is salty.
Pour the mixture into an oven safe bowl & bake on 375 for 15 - 18 minutes.
Sprinkle paprika if you want but it's delicious without it! Enjoy with tortilla chips, pita bread, plantain chips, whatever you like with your dip!
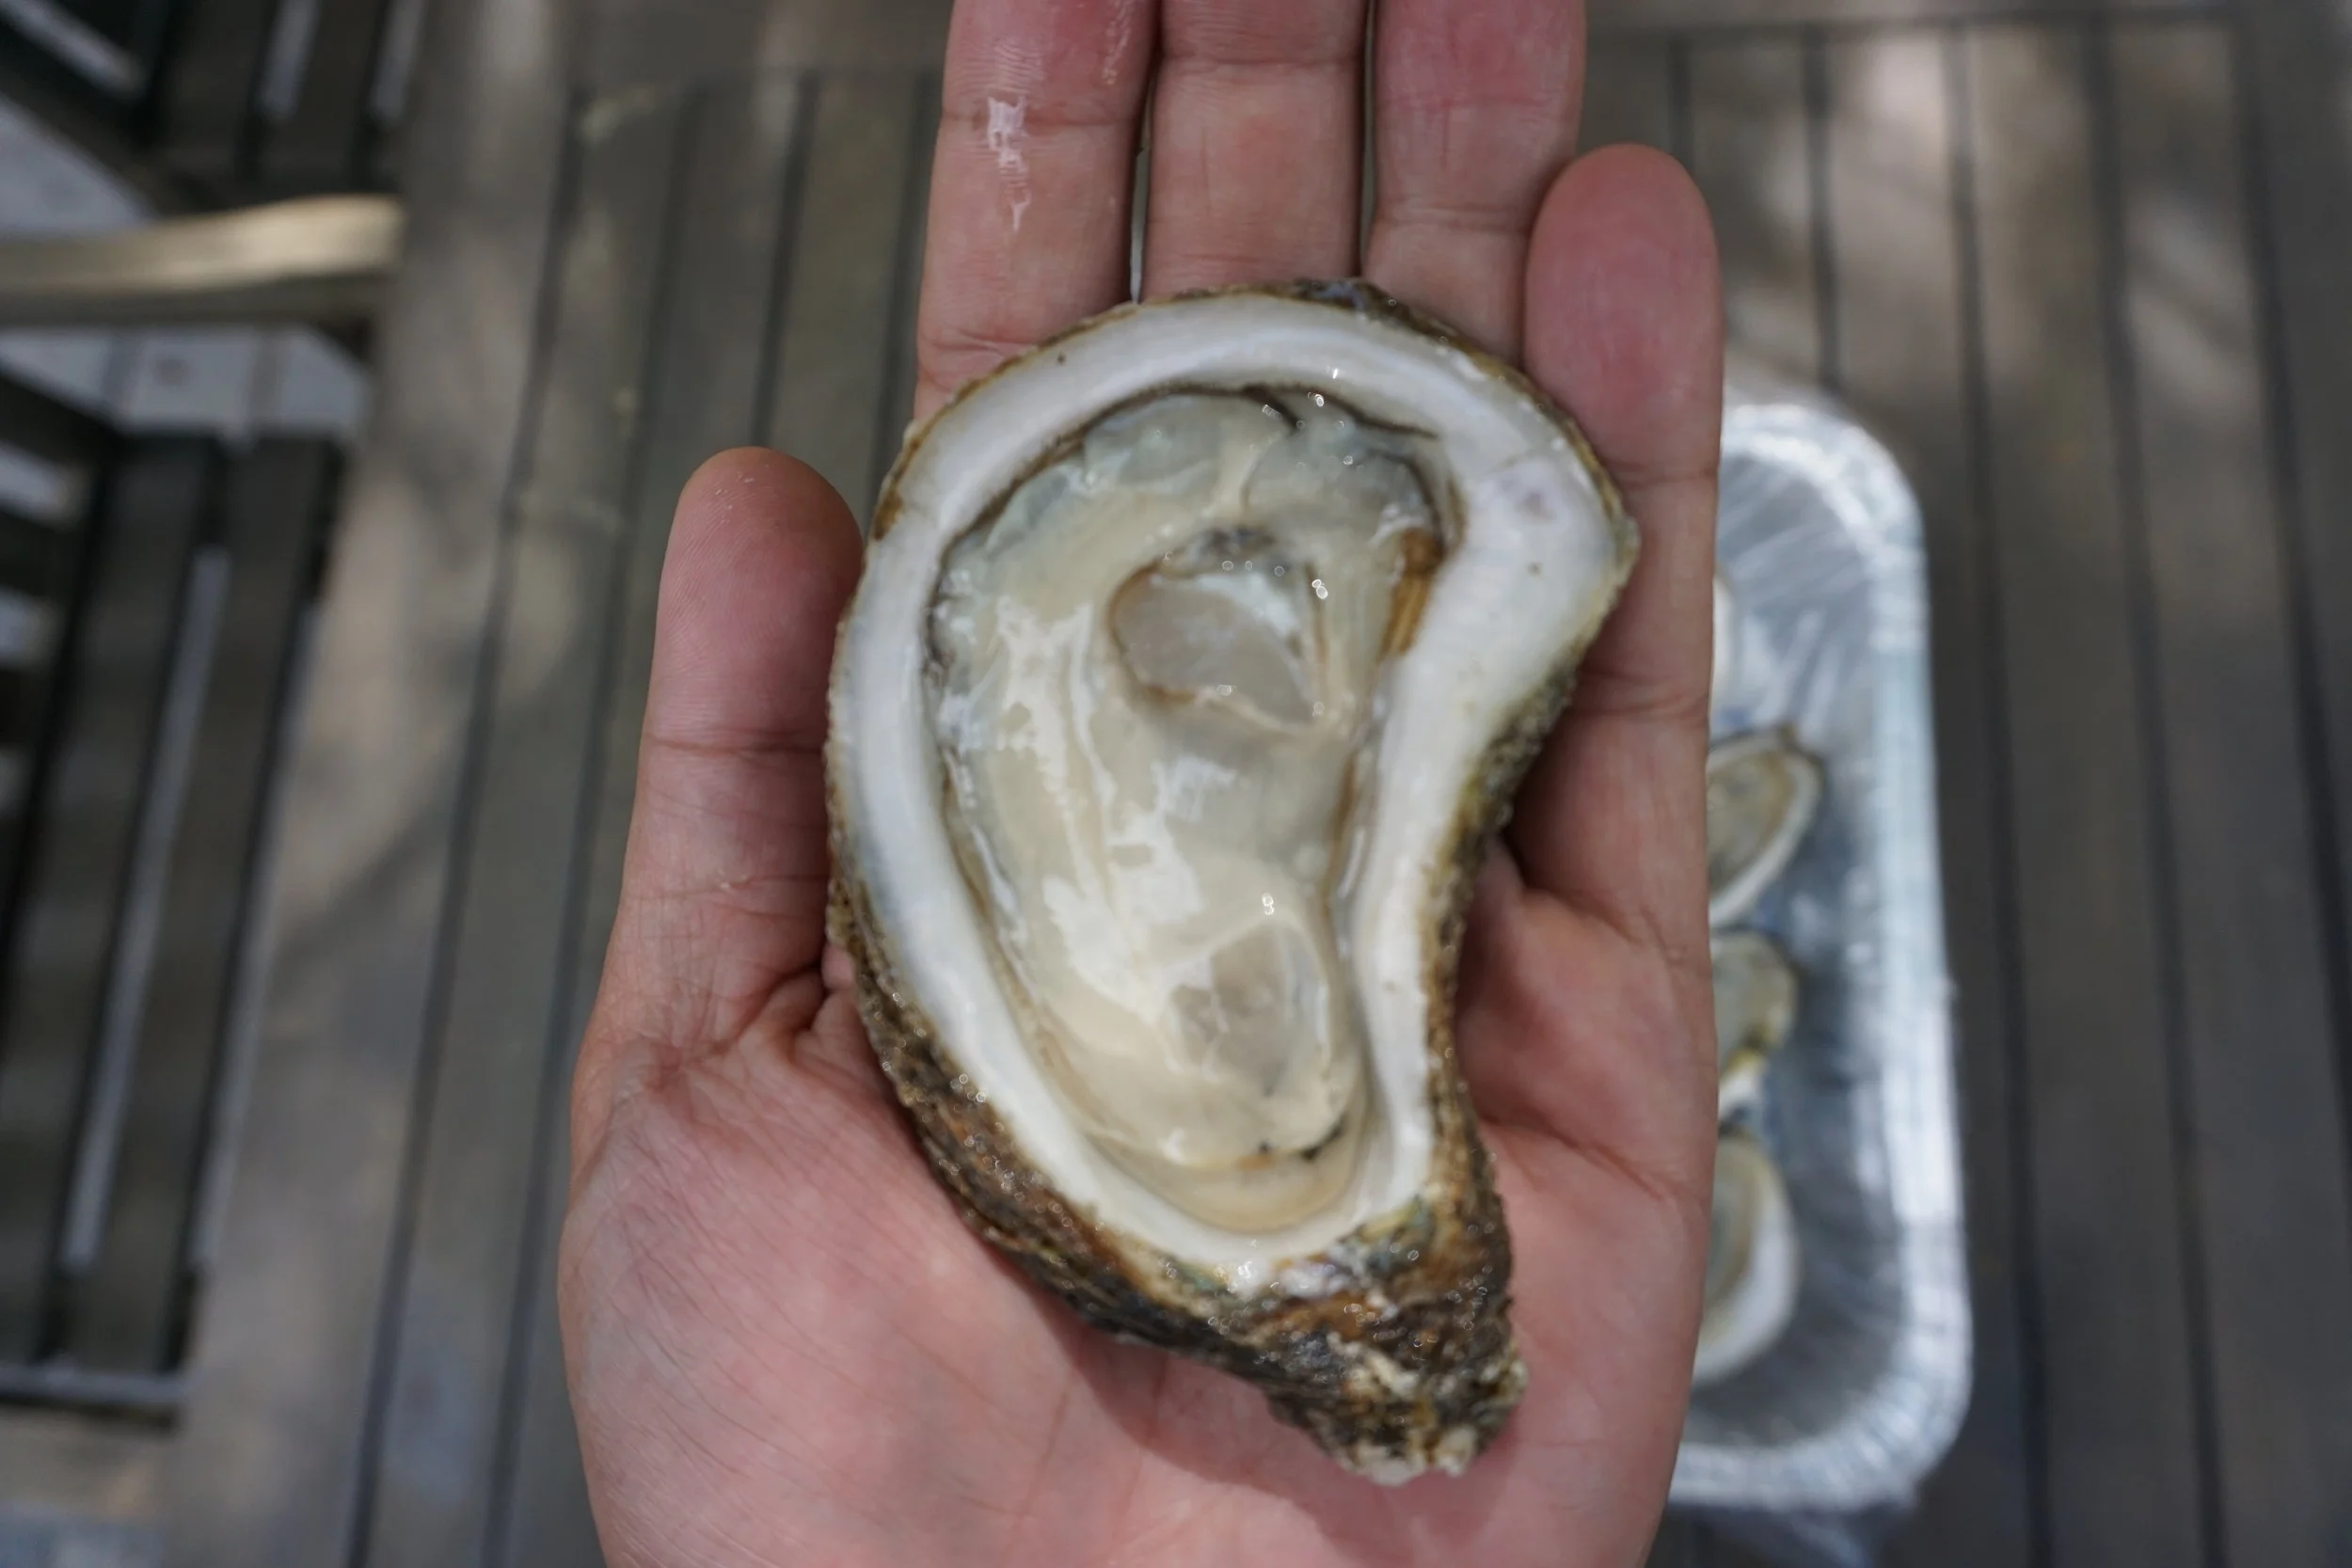
It may be September but summer isn't over yet. Not until the 22nd. So today we hunt for fresh oysters.
Did you know Wegman's in East Hanover stocks Kumamoto's? Kind of expensive, $2.25 a piece, but well worth it. However, for 6 of them, we paid the same amount as a dozen Bluepoints from Freeman's!
Freeman's Fish Market is in Maplewood, right down the street from where I get acupuncture :) and their seafood is incredible. I make a lot of dishes but this post is dedicated to the non-cooked seafood: oysters. Head to Freeman's and pick up your dozen, fully shucked, fresh Bluepoints on the half shell for $14.99 a dozen.
Here you go, folks! A healthy, crunchy, spicy (if you want) snack!! I don't know bout y'all but I feel so accomplished making my own snacks, especially when they are healthy. This one will take you ~40 mins. If you try this, tell me your spice combos, I'm dying to try new ones!
Time: 40 mins
Ingredients:
1 can chickpeas
1.5 tablespoons olive oil
ground cayenne pepper to taste
crushed red pepper to taste
salt to taste
Recipe:
Strain & rinse the canned chickpeas. You can boil them with 2 tablespoons baking soda before baking them, to remove the skins if you like.
Place the chickpeas in a medium bowl and toss them in the olive oil & cayenne. I used 1 teaspoon cayenne, this was perfect for me. Add more or less if you like. Or none at all!
On a cookie sheet lined with parchment paper, bake on 400 F for 30 mins.
Toss again with salt & crushed red pepper.
Allow them to cool completely before storing them in a bottle or zip loc bag or they will lose their crunchiness. But have no fear, if they aren't crunchy anymore the next day, you can put them back in the oven for another 2-3 mins on 400F to freshen them up!
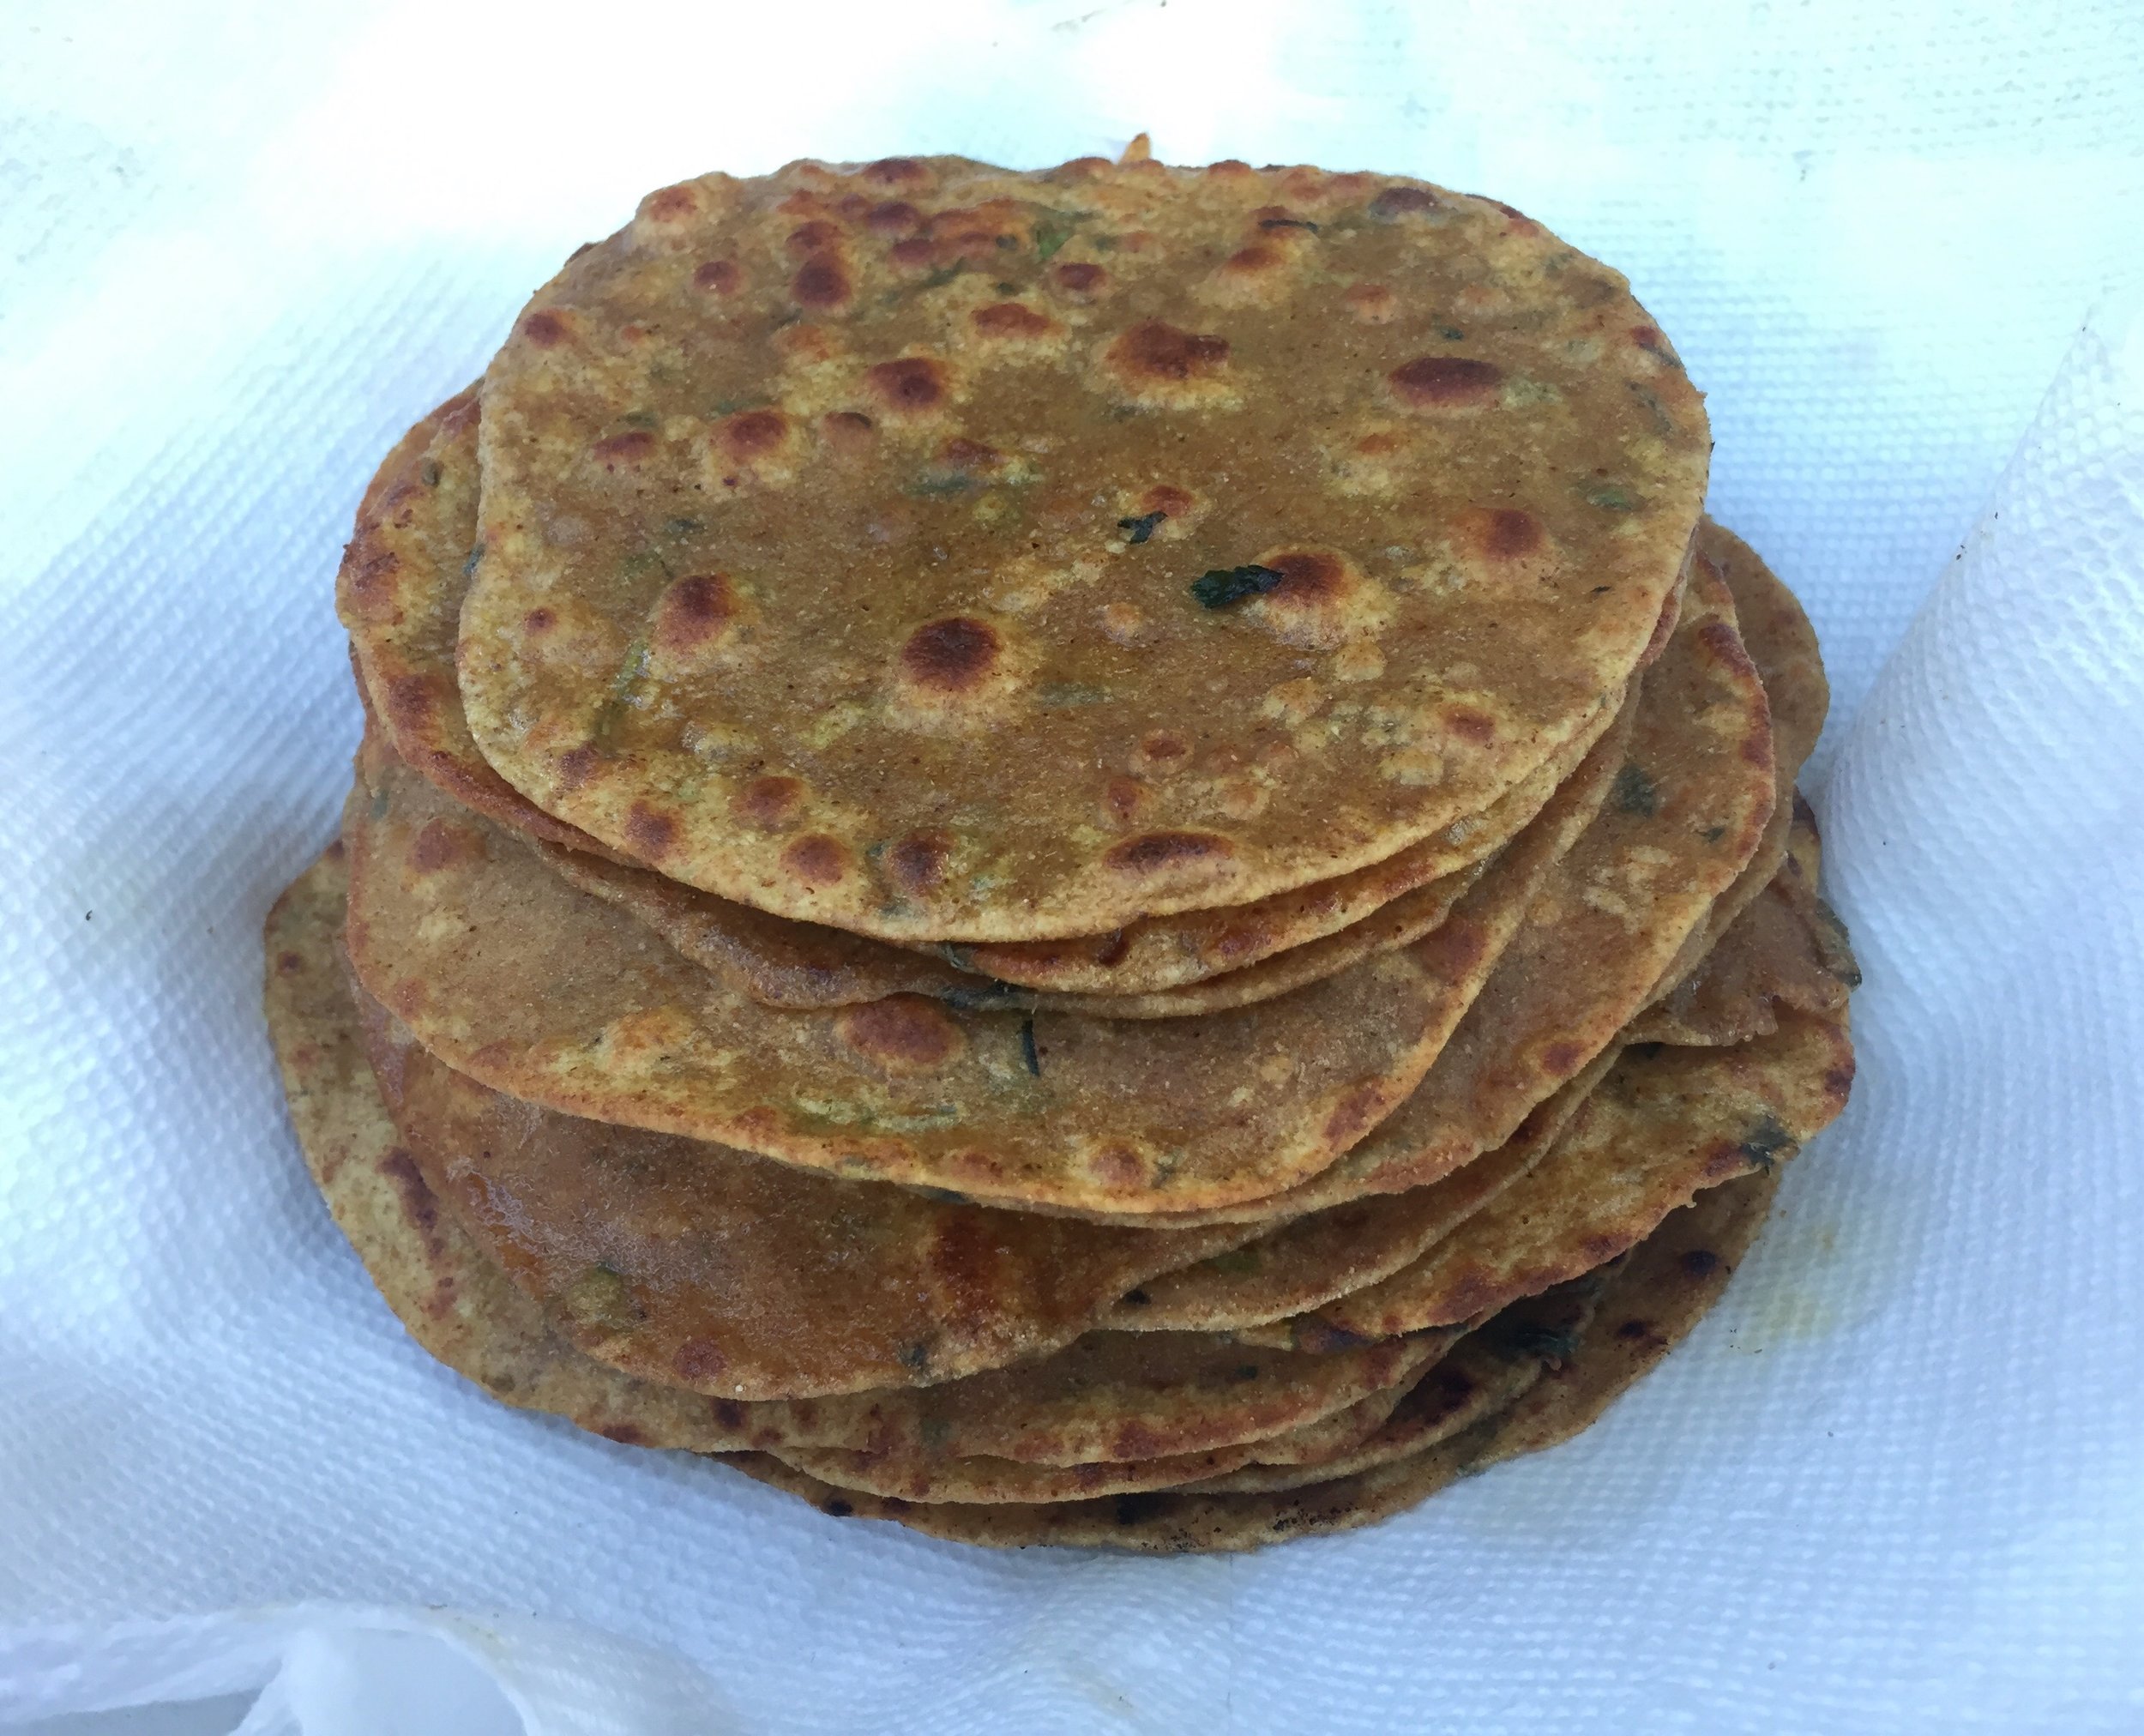
Theplas became one of my favorite Gujarati snacks when I started college & met my BFF. She is Guju & her mom would make her these divine, paper thin, loaded with flavor, incredibly complex tasting snacks. I learned that they are called theplas & they are not so complex to make! The cooler thing is that they are pretty healthy because of the fenugreek (methi) leaves. Fenugreek is known to help lower blood sugar, so it's great for diabetics.
Heres my take, don't be afraid to try it at home!
Time: 1.5 hours, yields 30 theplas
Ingredients:
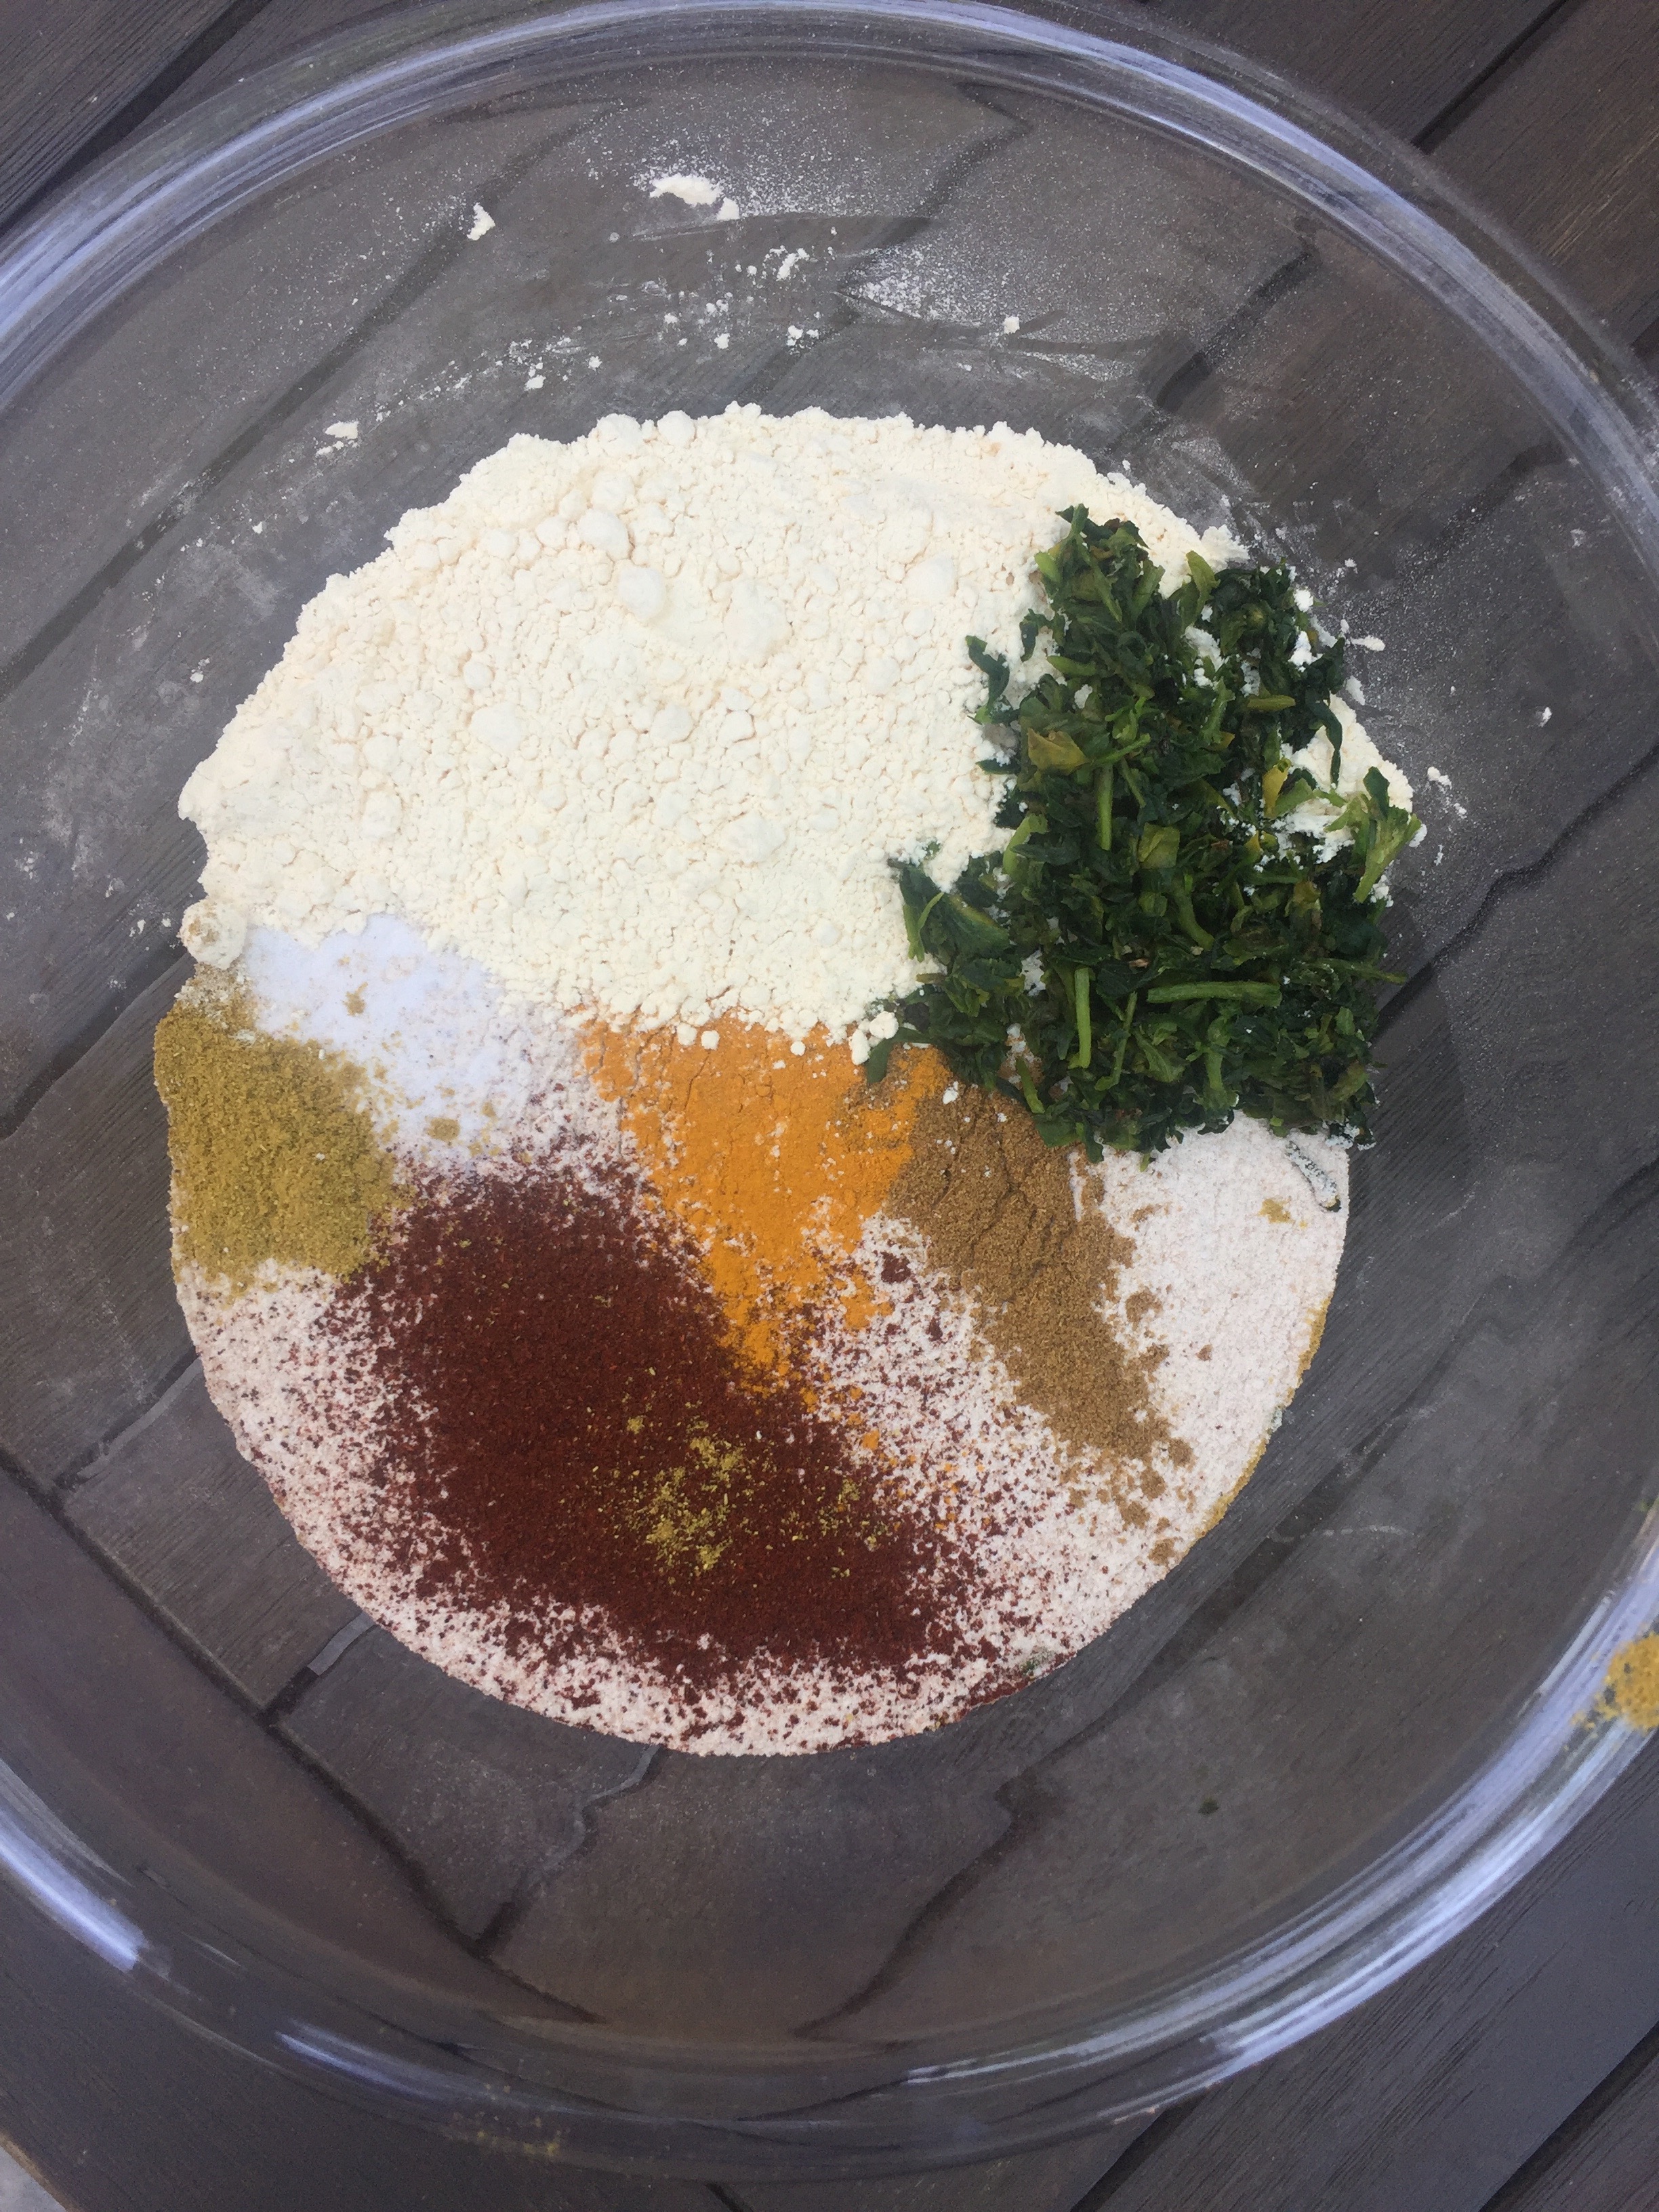
2 cups whole wheat flour
1/2 cup besan (gram flour)
3 tablespoons chopped fresh methi (fenugreek) without the stems
2 green chilis, sliced
1.5 teaspoons ground jeera (cumin)
1.5 teaspoons chili powder
1 teaspoon coriander
1.5 teaspoons haldi (turmeric)
ghee or butter for cooking
1 cup half & half (can use dahi / plain yogurt, or simply water)
water for kneading
Recipe:
In a large bowl, add the dry ingredients & the methi leaves, mix to combine.
Add in the half & half slowly, kneading a bit at a time.
Add in the yogurt & knead until all of the dry ingredients are incorporated into the dough.
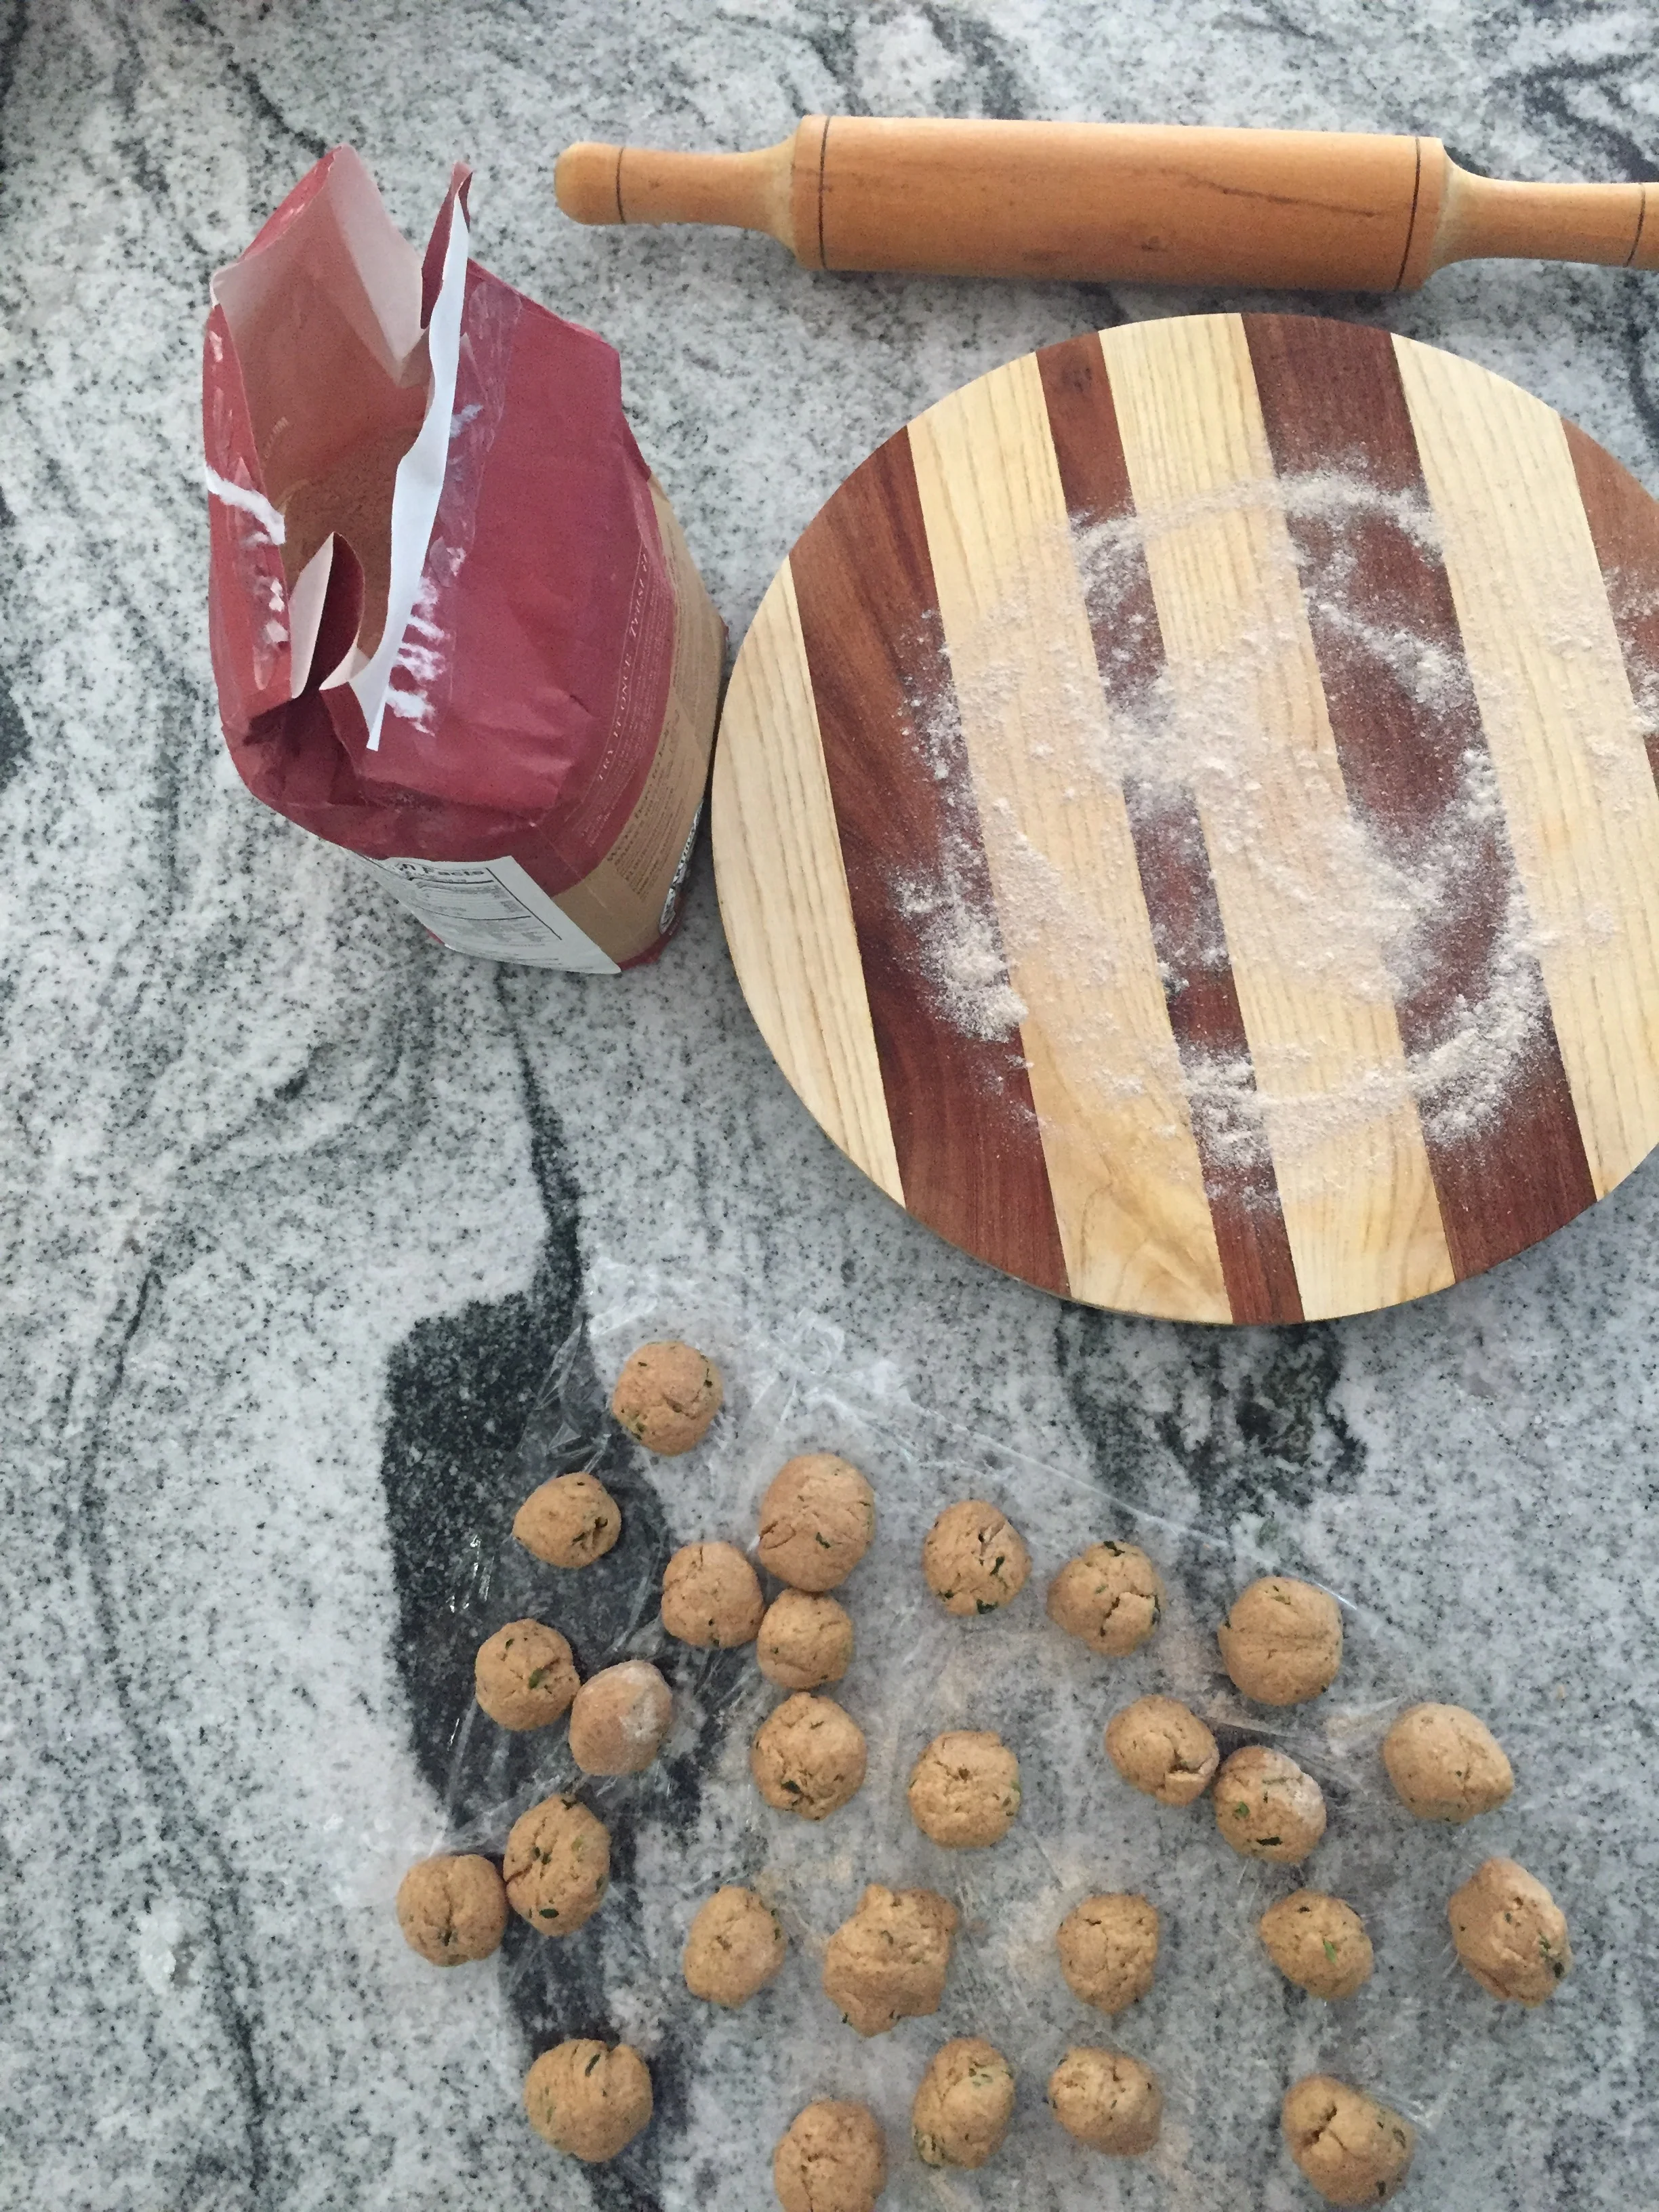
Wrap in plastic wrap & refrigerate for 15 mins.
Form golf ball sized pieces out of the dough, this mixture should give you about 30.
Roll out each piece with a rolling pin on a lightly floured surface. Sprinkle whole wheat flour down first to ensure the dough doesn't stick.
On a shallow pan or taawa, heat 1 teaspoon of butter or ghee. Use medium-low heat.
Place the round, flat thepla on the pan or taawa & butter the top side.
When you see a bunch of bubbles forming, flip the thepla over using tongs or a spatula. Let it brown slightly on the other side.
Put the cooked thepla in a container lined with paper towel to soak up the excess butter.
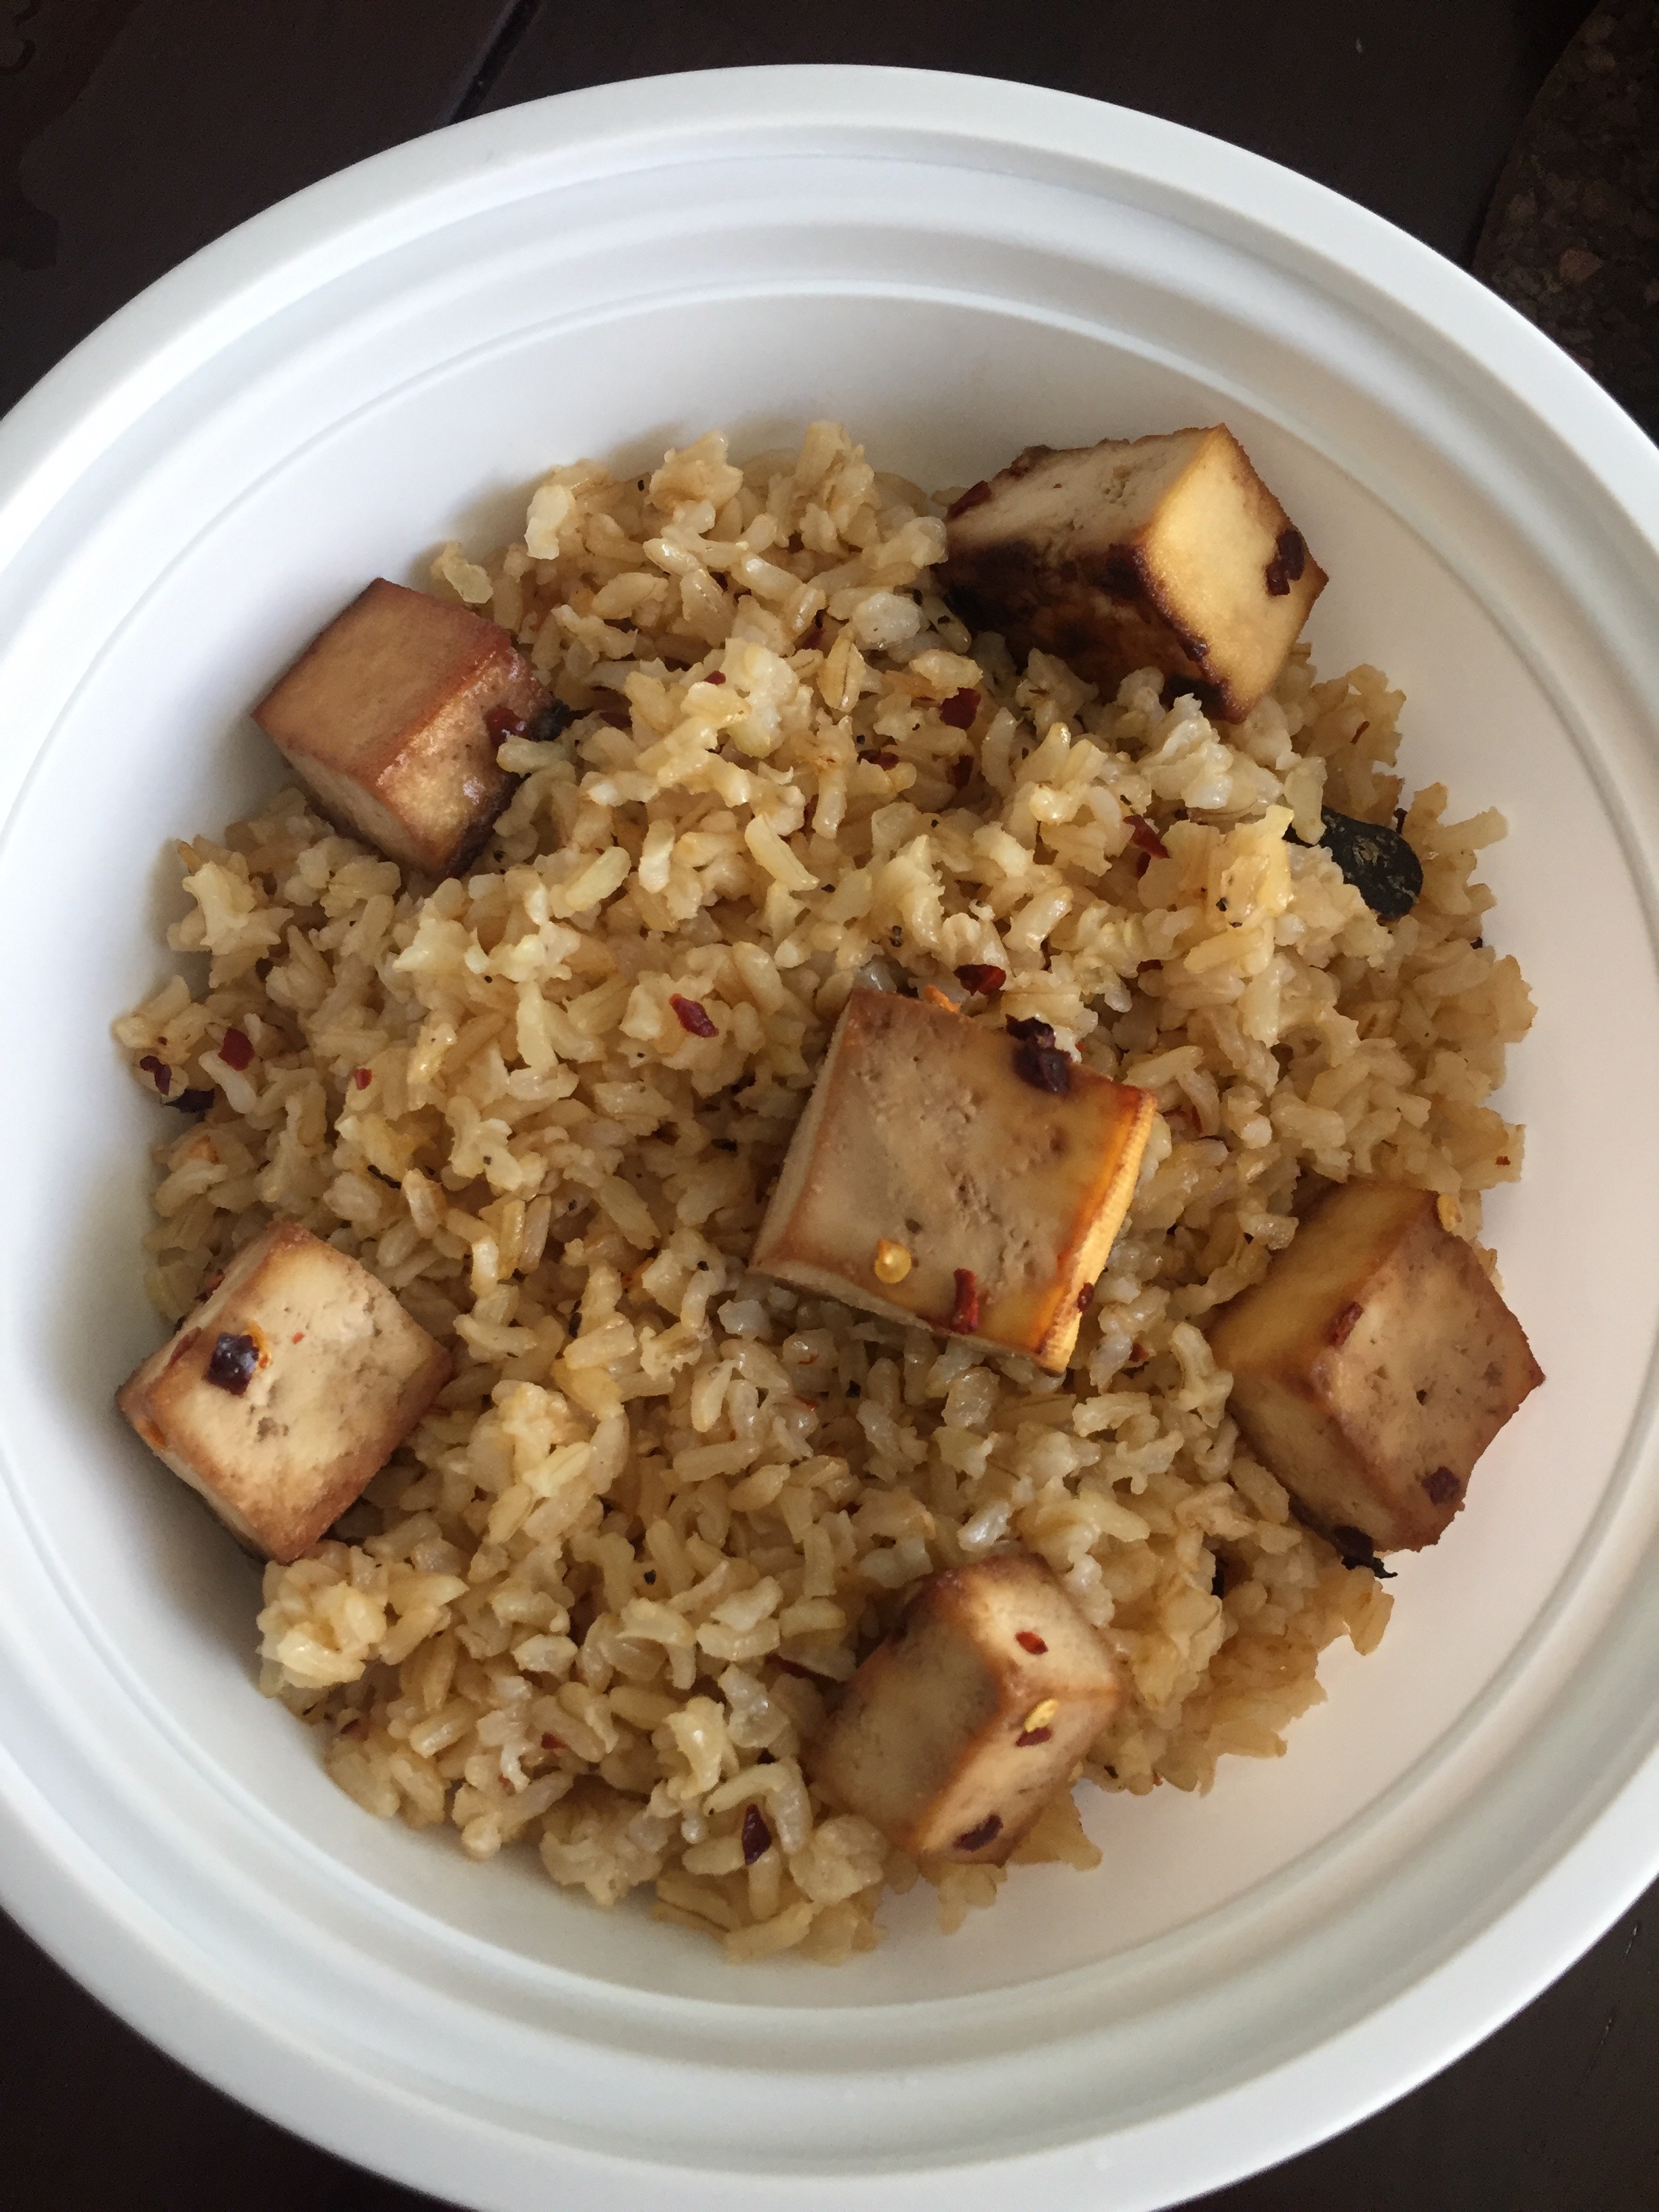
Tofu is so versatile that it can stop you in your tracks when trying to think of what to do with it. The possibilities are endless! I usually leave it raw & cube it up for a dish. Or grind it down in the food processor to make veggie patties. But I tried baking those cubes this time & I was pleasantly surprised! Here's my Asian spiced baked Tofu, you can go ahead and choose whatever seasonings you like.
Time: 1 hour
Ingredients:
1 pack extra firm Tofu
1/2 cup soy sauce
1 tablespoon honey
1.5 teaspoons crushed red pepper
1 teaspoon granulated garlic
Recipe:
Drain the Tofu well before transferring it to a small hand towel.
Cut it into cubes and place another hand towel over the cubes, press down to drain further. Use a can of vegetables or tomato sauce or something heavy to weigh it down. Leave the can on top of the towel for 10 mins to 30 mins (30 is better if you have the time!). This will help the moisture leave the Tofu.
Preheat oven to 400 F.
While the Tofu is drying, get a medium mixing bowl & add the other ingredients to it. Stir to combine, allowing the honey to distribute.
When the Tofu is dry, add a few cubes to the mixture & toss with your hands to coat every side of each cube. Using your hands helps the Tofu to remain in a cube & not break apart like it would with a fork or spoon.
Place the coated Tofu on a cookie sheet lined with parchment paper so it doesn't stick to the pan.
Repeat for all the remaining cubes, then bake for 25-30 mins.
Gotta have a fresh side dish (or main!) for your summer outdoor table? Look no further! Tabouleh is light, fresh, refreshing, yet filling at the same time. It bursts of flavor leaving you wanting more & more. Here's my take, enjoy!
Time: 10 mins
Ingredients:
2 handfuls flat leaf parsley
1 handful fresh mint leaves
1 handful spinach
1 tomato
1 slice red onion
1 small cucumber
Juice of 1/2 a lemon
1 tablespoon extra virgin olive oil
Recipe:
Carefully remove the stems then roughly chop the mint, parsley & spinach.
Cut the tomato, cucumber & the slice of red onion into small dices. Add it to the greens.
Drizzle on the lemon juice & olive oil.
At this point you can add in couscous or any other grain if you like. Toss to combine, refrigerate for 10-15 mins if you like it chilled.
An amazingly fancy appetizer that is sure to impress your guests! Baked clams has been a favorite of mine since I was a little girl. I remember my mom making them for special occasions / family parties. I'm excited to have my own recipe to share with you all!
Time: 1 hour
Ingredients:
1 dozen cherry stone clams (can use little necks)
1 cup panko
2 tablespoons melted butter
1 teaspoon chili powder
1 teaspoon garlic powder
1 teaspoon dried parsley
salt & pepper to taste
1/2 cup white wine
1 teaspoon dried oregano
juice of 1/2 a lemon
Recipe:
Scrub the clams under cold water to remove any sand.
In a large pan, bring the wine to a boil, then add the clams & cover the pan. Reduce the heat to a simmer.
Allow the clams to cook just enough to open up, about 7 minutes.
Remove the clams from the heat, remove the meat from the shells, and set the shells aside.
Use a knife to chop the meat into smaller chunks.
Peheat oven to 450.
Transfer the meat to a mixing bowl & add in all the other ingredients above. Mix to combine. Tip: use whatever you feel like using to spice this up! I added chopped Jalapeño slices for a little kick.
Fill the half shells with the mixture, then place them on a cookie sheet & bake for 10 mins or until the filling is golden brown. Voila!
Oh em gee... probably my favorite dessert ever! And I finally built up the confidence to try making it. The process for macarons is tedious because you need to be really precise & careful at every stage or you'll mess them up. But, if you do follow the process correctly, you'll end up being so happy with the results! Here's my take, enjoy!
Time: 1 hour total for about 25-30 macarons
Ingredients:
1 cup powdered sugar
3/4 cup almond flour, finely ground
1/4 cup granulated sugar
3 medium egg whites (or 2 large)
food coloring if desired
Recipe:
Combine the powdered sugar & almond flour then sift them together into a bowl. Set the mixture aside.
Mix the egg whites in a mixer on medium speed for 30 seconds.
Increase the speed to high then add in the sugar, half at a time. If you are using food coloring, pour that in now. I used 3-4 drops of color for mine.
Leave the mixer on high until you see stiff peaks start forming. Stop the mixer.
The wet ingredients are ready when you can take some into a spatula & the batter falls off in the consistency of lava.
Slowly, half at a time, mix in the dry ingredients. Fold them in slowly, careful not to over mix. After half the mixture is incorporated, add in the second half and do the same folding.
Once the mixture is combined, you can scoop it into a piping bag.
Pipe the batter into a cookie sheet lined with parchment paper, using a macaron template (I got mine on Amazon with a silicon piping bag) or just average about a quarter size for each round. You want to give them enough room to expand slightly as the batter settles.
Once all of the rounds are piped out, lift the cookie sheet & drop it down hard, so it bangs on the countertop a few times, turning it on each bang. This will get rid of any excess air bubbles.
Leave the macarons out for 15-30 minutes until a slight shell appears over them. To test this, gently press your finger on one of them and if no batter comes off onto your finger, they're ready to go!
Bake on 300 for about 12-15 minutes or until the cookies are hard but not browned.
Allow the macarons to cool for 20 minutes before moving them to a cooling rack. Then, let them cool completely on a cooling rack before filling them.
For the filling, I made salted caramel, dark chocolate ganache, cream cheese icing, and a pistachio filling made by boiling butter, half & half, ground pistachios, and confectioners sugar.
Weird to try making something you never ate before! What can I say, I'm adventerous! And I'm glad I tried it. Succotash just might be the perfect side dish for Spring (if it ever shows up!)
Time: 40 mins
Ingredients:
1 can lima beans
2 cups corn kernels (I used frozen)
1/2 white onion
3 cloves garlic
1 teaspoon dried thyme
1/3 red onion, diced
2 cups grape tomatoes
1 tablespoon olive oil
1 tablespoon red wine vinegar
Salt & pepper to taste
Recipe:
Pour the lima beans, 1/2 onion, garlic cloves & some salt and pepper into a medium sized pot. Cover with water.
Bring the water to a boil then cover the pot & lower the heat to a simmer. Let simmer for 20 mins.
Once the 20 minutes are over, reserve about 1 cup of the liquid, then strain the rest. Remove the garlic cloves & half onion.
In a large skillet, add the olive oil & the red onion. Sauté for 1 min on medium heat.
Add the tomatoes, thyme & the corn to the skillet.
After about 3 minutes, add the lima beans, red wine vinegar & reserved liquid to the skillet. Add salt & pepper now as well.
Toss the mixture to combine, then remove it from heat & serve!